Photo of the day: Electric shock survival
The danger from an electrical shock depends on the type of current, how high the voltage is, how the current traveled through the body, the person’s overall health, and how quickly the person is treated.
An electrical shock may cause burns, or it may leave no visible mark on the skin. In either case, an electrical current passing through the body can cause internal damage, cardiac arrest, or another injury. Under certain circumstances, even a small amount of electricity can be fatal.
In the photo of today( Electric shock survival), you will be familiar with Electric shock first aid treatment


1) Danger
If you suspect someone has received an electric shock you must ensure all power sources are isolated before you can treat the casualty. The action you take will depend on whether the risk is posed by high voltage or low voltage electricity.
High Voltage
Overhead power cables are an example of a power source generating high voltage electricity. High voltage electricity has the ability to ‘jump’ or ‘arc’ up to distances of 18 meters or more. If faced with a casualty as a result of, or in the vicinity of, dangerous high voltage electricity, DO NOT APPROACH! Stay at least 25 meters away from the casualty until the power has been switched off by an official agency i.e. the Electricity Board.
Low Voltage
If faced with a casualty who is in the process of receiving a low-voltage electric shock you should:
- Act to break the contact between the casualty and the electrical supply. If possible to do so safely, you should turn off the source of electricity, either by switching off the current at the mains, turning the power off at the circuit board, removing the plug, or wrenching the cable-free.
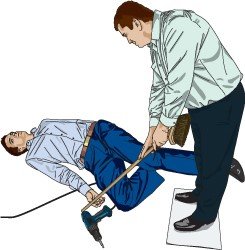
- Alternatively, move the source of the shock (i.e. hairdryer, power tool) away from yourself and the casualty using an object of low conductivity. First, stand on dry insulating material, such as a book, newspapers, or rubber matting. Then, use a long, low-conductivity object like a wooden broom or specially designed Electric Shock Rescue Hook to push the power source away from the casualty or move the casualty’s limbs away from the power source.


Want to have High-Quality Photo Tiles That Stick and re-stick go to Wallpics
2) Response
To give your casualty the optimum chance of survival you must quickly assess their levels of response. A rapid assessment will allow effective treatment to be administered and will also allow for accurate information to be passed on to the ambulance service. DO NOT touch the casualty if you have been unable to isolate them from the source of the electrical shock or turn off the electricity.
- Check whether the casualty is conscious:
1. Ask “hello, can you hear me?” and call their name if you know it.
2. Ask in both the casualty’s ears for them to open their eyes.
3. Pinch an ear lobe or tap the shoulders.
4. Shout for HELP!
5. DO NOT move the casualty unless the environment or situation is dangerous.
If the casualty is responsive, call emergency services now.
3) Unresponsive casualty
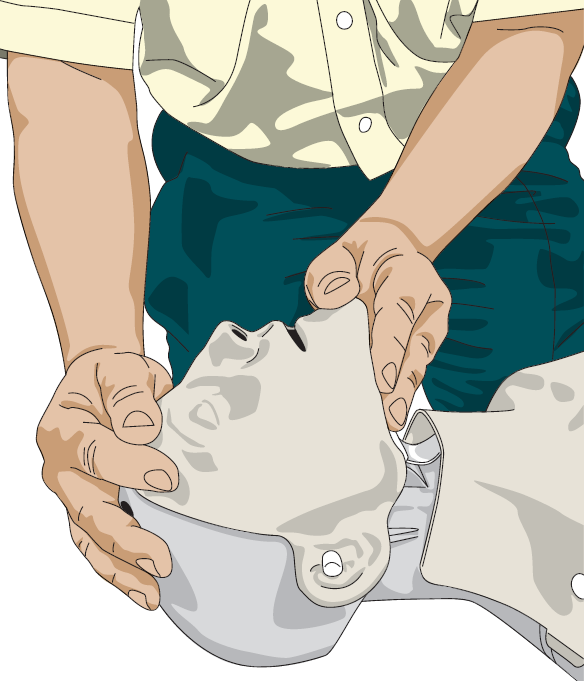
Your first priority is to open the casualty’s airway and check for breathing. Open the airway by lifting the chin and tilting the head back. This will free the tongue from the back of the throat. If you are unable to open the casualty’s airway in their current position, roll them onto their back. Check the mouth for any obvious instructions.


Then, check for breathing as follows:
1. LOOK for the rise and fall of the chest.
2. LISTEN for the sounds of breathing.
3. FEEL for air on your cheek
4. Carry this out for up to 10 seconds
If the casualty is breathing, put them into the recovery position (see section 6) and then call 999 for emergency help. Continually monitor and record vital signs – breathing, pulse, and responsiveness – until help arrives.
If the casualty is not breathing normally:
1. Ask a helper to call 999 for an ambulance and then to bring an AED if available. If you are alone, make the call yourself.
2. Begin CPR with chest compressions as soon as possible. Do not leave the casualty to search for an AED.
When phoning emergency services, DO NOT hang up at any stage of the conversation. The operator will terminate the call when appropriate. You should determine responsiveness and whether the casualty is breathing before speaking to the emergency services because this enables them to assign the appropriate priority to your situation.
4) Unresponsive and not breathing normally – giving CPR
1. Ensure the casualty is lying on their back on a firm, flat surface
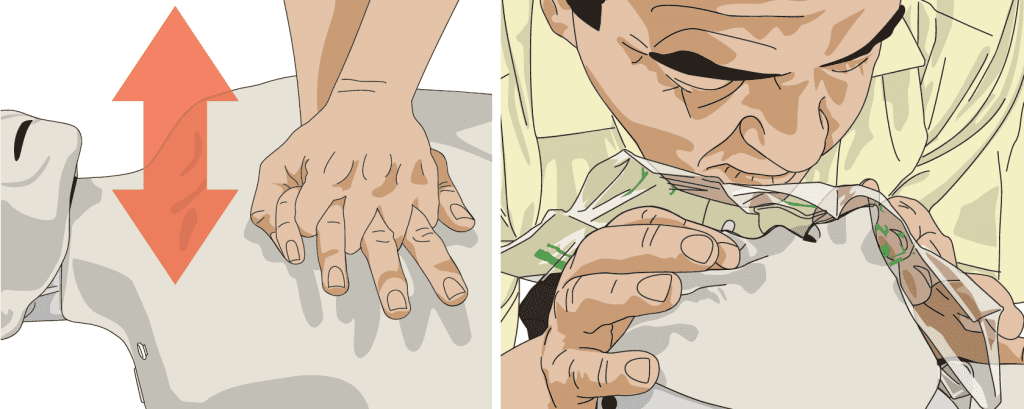
2. Place your hands one on top of the other in the center of the casualty’s chest
3. Compress the chest (up to a maximum depth of approximately 4-5cm) 30 times at a rate of 100-120 compressions per minute. The compressions and releases should take an equal amount of time
4. After 30 compressions, open the airway again using the head tilt/chin lift
5. Seal the nostrils with your thumb and forefinger
6. Blow steadily into the mouth until you see the chest rise. This should take about a second. If available, it is advisable you use resuscitation equipment, such as a face shield.
7. Remove your mouth to the side and let the chest fall. Inhale some fresh air and repeat these steps so you have given 2 effective rescue breaths in total.
8. If the chest does not rise after the second breath, go back to 30 compressions and then try again with 2 breaths.
9. Return your hands to the correct position on the chest and give 30 chest compressions.


Continue giving CPR at a ratio of 30 compressions followed by 2 rescue breaths until:
- The casualty shows signs of recovery
- Emergency services arrive
- The situation changes and you are now in immediate danger
If you feel unable to give rescue breaths, hands-only CPR is far better than not performing CPR at all.
5) Defibrillation
If an AED is available, power on the device and follow the prompts.
6) Unresponsive and breathing – the recovery position
If the casualty is unresponsive and breathing normally, turn the casualty to the recovery position. This allows the head to be tilted back and down, stopping the tongue from blocking the airway and allowing any vomit or fluid to drain safely from the mouth.
1. Check for any other obvious injuries
2. Remove sharp objects from casualty’s pockets
3. Turn the casualty into the recovery position as follows:
4. Place the nearest arm at a right angle to the body
5. Draw the furthest arm across the chest and place the back of the hand across the cheek nearest to you
6. Keep this here whilst you raise the furthest leg by grasping the top of the knee
7. Gently pull on the knee so the casualty pivots over onto their side facing you
8. The casualty should be fully onto their side and stable
9. Adjust the upper leg so the hip and the knee are bent at right angles
10. Re-check the airway, breathing, and circulation. Ensure the airway is open
11. Check for continued breathing
12. Ask someone to call 999 if not done already. If you are alone, do so yourself. Leave the casualty if necessary but return as soon as possible.
(learn more:AED-the-life-saving-devices-that-everyone-should-know-how-to-use/)


7) Burns
Exposure to electricity can cause burns to the skin, and in severe cases, the internal organs. The electricity may cause ‘entry’ and ‘exit’ burns – for example, entering via a hand and leaving via the feet.
For responsive casualties:
- Cool burns for a minimum of 10 minutes under cold water
For unresponsive casualties:
- Cool the burn with wet dressings (or special burn dressings) after placing them in the recovery position.
DO NOT
- Burst any blisters
- Apply adhesive dressings
- Remove damaged skin
- Apply ointments/creams
- Cover with ‘fluffy’ dressings
- Affix dressings too tightly
- Apply butter/fats/margarine or other substances commonly believed to cool burns
- Remove damaged clothing
- Apply ice
8) Other injuries
Muscle spasms/seizures: These may be present for some time after the exposure to electricity and indicate a seriously ill casualty.
Action in the event of a major seizure:
1. If standing, the casualty will almost definitely collapse during a major seizure. Try to control the fall.
2. Ensure the safety of the casualty by removing any objects that may cause injury if struck.
3. Place padding under the head. Improvise if necessary with clothing.
4. DO NOT place anything inside the casualty’s mouth
5. Loosen any clothing that may restrict the airway
6. Try to time the seizure
When the seizure has subsided:
1. Check the casualty’s responsiveness and Airway, Breathing, and Circulation (ABC)
2. If unresponsive and breathing normally or semi-conscious, place the casualty in the recovery position. Continue to monitor ABC and other injuries
3. If unresponsive and not breathing, perform CPR
Casualties with no apparent injury:
If no injury is present and the casualty appears well, it is still advisable to take the casualty to a hospital or medical facility for a check-up, as certain organs/systems within the body may be affected several hours after a shock.
Download the Infographic
Photo of the day: Photo of the day: Electric shock survival
More photos:
- Photo of the day: 10 Essential Safety Tips for Driving in Hot Weather Conditions
- Photo of the day: best workplace safety tips
- Photo of the day: The Importance of Stop Work Authority in Maintaining Workplace Safety
- Photo of the day: Tomorrow’s Reward for Working Safely Today: Cultivating a Culture of Safety
- Photo of the day: Preventing slips and trips at work
- Photo of the day: Learn the DRSABCD action Plan
- Working with Electricity Electrical Accidents Guide for Electrical Workers
- Photo of the day: Hearing Protection Device Selection
- Photo of the day: If An Earthquake Shakes You-Infographic free
- Fire Safety Posters Free Download
- Photo of the day: First Aid for Electrical Burns-Infographic free
- Infographic: First Aid for Cuts and Scrapes free download
- Photo of The day: Work Safe with Lasers-Laser Safety free
- Photo of the day: Working Safely with chemicals and chemical Management
- Photo of the day: Safe work practices when using MEWPs ( updated)
- Photo of the day: Preventing Common Kitchen Hazards
- Photo of the day: Safe handling of Gas Cylinders and lecture bottles
- Photo of the day: Forklift Stability Triangle
- Photo of the day: Defective Tools Safe Work Practice
- Photo of the day: Lift With Your Legs Not With Your Back
- Photo of the day: First Aid for burns
- Photo of the day: The 7 Principles of HACCP
- Photo of the day: Working Safely with Suspended Loads
- Photo of the day: Heat Stroke First Aid and safety posters
- Photo of the day: Near-Miss Reporting and Posters
- Photo of the day: Ergonomic chair and office chair safety tips
- Photo of the day: Whole Body Vibration
- Photo of the day: Substation Safety Equipment
- Photo of the day: Bypassing Safety Controls Rules
- Photo of the day: Lightning Safety Tips
- Photo of the day: Overhead Power lines Clearance
- Photo of the day: Floor Marking
- Photo of the day: Types of Foot Protection
- Photo of the day: Types of Hand Protection
- Photo of the day: Lockout and Tagout Safety
- Photo of the day: Fall Protection Plans
- Photo of the day: Flood Safety Tips
- Photo of the day: Read All Labels Work safe
- Photo of the day: Run Project safely with Crane Hand Signals
- Photo of the day: Flagman and Traffic control
- Photo of the day: Managing Risks of Exposure to Solvents in the workplace
- Photo of the day: Scissor Lift Safety
- Photo of the day: HSE Bulletin Board
- Photo of the day: Arc-Fault Circuit Interrupters (AFCI)
- Photo of the day: Safe use of ladders and step ladders
- Photo of the day: Concrete Truck Driver Hand Signals
- Photo of the day: Extension Cord Safety Tips
- Photo of the day: Protect your Head
- Photo of the day: choosing the right Anchorage
- Photo of the day: Work-Related Asthma
- Photo of the day: Top FIVE Heavy Equipment Construction Site Safety Tips
- Photo of the day: sun safety in the workplace
- Photo of the day: Cannabis and Impairment in the Workplace
- Photo of the day: Position for safety and comfort-Safety Tips
- Photo of the day: Generator Safety
- Photo of the day: Controlling COVID-19 in the Workplace-Physical Barriers
- Photo of the day: Manual Material handling
- Photo of the day: Personal Protective Equipment last resort
- Photo of the day: WHMIS 2015 – Pictograms
- Photo of the day: Indoor Air Quality
- Photo of the day: Noise in the affected workplace
- Photo of the day: Fatigue at Work
- Photo of the day: Don’t be Driven to Distraction
- Photo of the day: working in heat and Humidex Rating
- How to use Plate Clamps Safely: Safety Moment#34
- Photo of the day: Sitting at work
- Photo of the day: 5 ways to reduce the risk of Slipping and Tripping
- Photo of the day: Preventing the spread of contagious illness
- Photo of the day: Incident Investigations
- Photo of the day: 10 Scaffold Safety Essentials
- Photo of the day: Effective Health and Safety Committees
- Photo of the day: New worker Orientation & Safety Orientation checklist
- Photo of the day: Workplace Inspection
- Photo of the day: musculoskeletal disorders
- Photo of the day: Emergency preparedness in the workplace
- Photo of the day: Mental health in the workplace
- Photo of the day: Trenching Safety Tips That Can Save a Life
- Photo of the day: Dangerous Goods Classes
- Photo of the day: Safety Equipment for Confined Spaces
- Photo of the day: Tips to reduce Heat stress in the workplace
- Photo of the day: hierarchy of controls
- Your steps to chemical safety
- H2S Gas and how to handle its Emergency
- Photo of the day: Importance of Mock drill and Fire Action Emergency Procedure
- Photo of the day: Choosing the Right Face Mask and the difference between a respirator and face mask
- Photo of the day: Confined space safety Precautions
- Breath Safely: The Proper Use of Respiratory Protection
- Photo of the day: Electric shock survival
- Photo of the day: Chemical Spill Emergency Response
- Photo of the day: Construction Site fire Safety
- Photo of the day: Confined Space rescue
- Photo of the day: Conveyors Safety Tips
- Photo of the day: 5 Essential outcomes of an effective leadership survey process


