DRSABCD is a common acronym that you’ll see in various places nowadays, especially in regard to emergencies, first aid, and CPR. At first glance, it doesn’t look like the most straightforward acronym to remember – or pronounce, for that matter. And yet, “ DRSABCD” and “ DRSABCD protocol” will often be dropped into workplace documentation or first aid information, often without further explanation. Learning basic first aid techniques can help you cope with an emergency. You may be able to keep a person breathing, reduce their pain or minimize the consequences of injury or sudden illness until an ambulance arrives. This could mean the difference between life and death for them. in the photo of today you will be able to recognize an emergency and give basic first aid until professional help arrives.
Also, Read Photo of the day: Electric shock survival
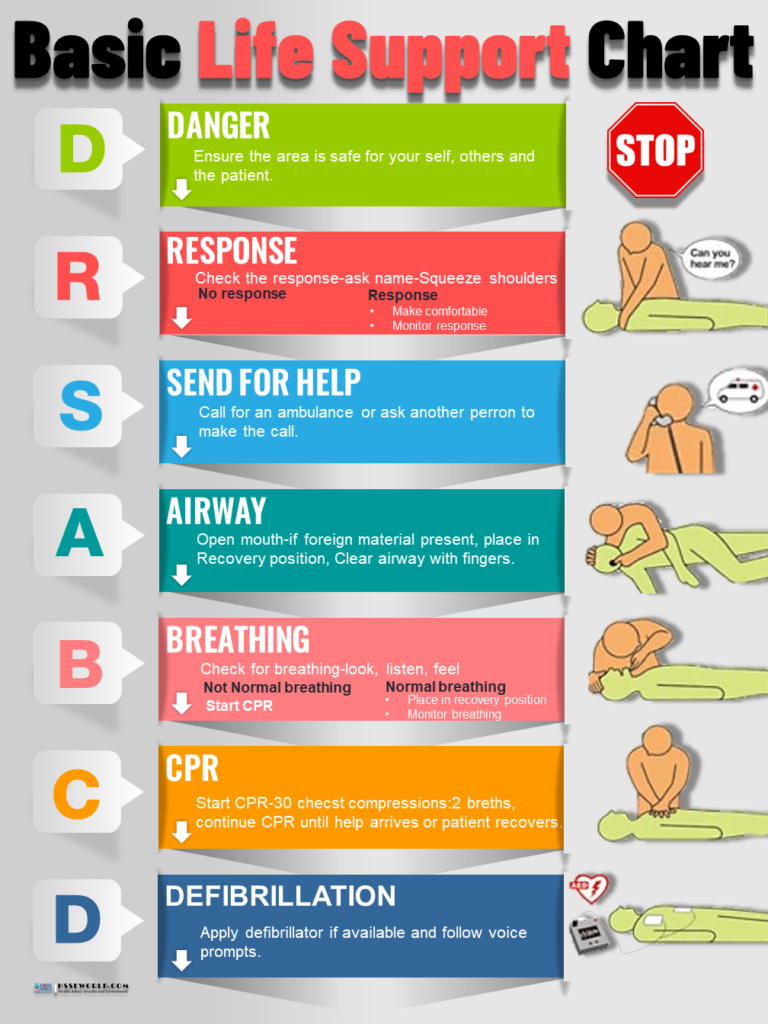
What does DRSABCD stand for?
Its meaning focuses on maintaining safety for the injured or ill person, as well as others at the scene, simply by prioritizing the order of events.
If you’re new to that acronym, you’ll be pleased to know that it’s generally pronounced “Doctors ABCD” (as in “Doctors A, B, C & D”) rather than “Dris-Abb-Kuh-Duh” or something equally strange. But what does it mean? What on earth does DRSABCD stand for, and why is it important?
D is for Danger
This is first and foremost. Danger needs to be dealt with before anything else.
There is often a physical threat present in first-aid situations that involve injuries or illnesses. The potential danger can be a threat to you, to bystanders, as well as to the person already in need of attention.
This danger can be present in many forms, including live wires, overflowing liquids, gases, moving vehicles, dangerous animals and people, sharp objects, falling objects, and more.
The first step in DRSABCD is to make sure you are not at risk from such a hazard. Then try to ensure that no one else is.
If more victims were to be added, first aid quickly becomes unmanageable.
R is for Response
Seek a response to find out if the person needing attention is conscious or not.
The C.O.W.S. method is an effective way to assess whether the casualty is responsive. It’s easy to remember and involves, talking to, touching the casualty, and using both questions and commands.
COWS instructions for a response in DRSABCD
Can you hear me?
Ask, can you hear me? Are you hurt or sick? Also, ask if you can help the casualty. This has the added advantage of gaining consent, or not, as well as eliciting a response.
Open your eyes.
Instructing the casualty to open their eyes is the most instinctive action the casualty will take, if they are able to. If their eyes are open, are they able to ‘look left’, ‘look right’ etc.
What is your name?
Asking their name is also instinctive. It does not matter if they give the correct name, so long as they respond to your question.
Squeeze my hands.
Squeeze the casualty’s hand to see if they squeeze you back. A casualty that cannot hear you, may feel your squeeze and respond accordingly.
There’s no need to aggressively shake a casualty to gain a response. Definitely don’t shake a child or infant.
Simply touching the casualty’s hand or shoulder and talking assertively is effective and will awaken a sleeping person.
It’s possible for a casualty to be conscious but not respond. For example, a person having an Absence Seizure will be conscious but will be unable to respond to questions and commands.
A casualty who is unresponsive should be treated as unconscious.
If the casualty responds by speaking or moving and appears conscious, leave them in the position in which you found them (provided there’s no further risk of danger).
This response will help determine your next first-aid steps.
Conduct a ‘secondary survey’ — a verbal and visual assessment of their condition.
The verbal assessment would include questions such as:
- What happened?
- Are you injured?
- Do you have any pain?
- Do you feel ill?
- Do you have a medical condition?
The visual assessment comprises a head-to-toe examination, looking for bleeding, burns, bites, abnormal swelling, etc. Also, checking for medical alert bracelets and the existence of medication in the casualty’s hand or laying nearby.
Get help if you need it. Monitor and reassess the casualty regularly.
S is for Send for help
First-aid treatment is not a substitute for professional medical care. In a medical emergency, you should waste no time calling for an ambulance or emergency services.
In order to stay focused on the casualty, have someone else in your vicinity make the call for help on your behalf.
It’s important to send for help as early as possible.
- Shout for help to alert people nearby
- If you can, have a bystander call for an ambulance
- Ask someone to locate and fetch an AED if possible
- If no one else is around, call the ambulance on your mobile phone
Emergency Number — this is the national number for Fire, Ambulance, and Police emergencies in your country.
An Emergency Call function can be found on the lock screen of any powered-on mobile phone.
Emergency Numbers can be dialed from any mobile phone in your country, as well as anywhere else in the world with GSM coverage. This system does not use satellite technology, only GSM technology.
special Number is a text-based emergency call service for people with a hearing or speech impairment. This service uses TTY (teletypewriter) and does not accept voice calls or SMS messages.
You, or a bystander, should provide basic information, answering the operator’s questions as best as possible.
The operator will ask:
- Which emergency service do you want, Ambulance, Fire, or Police?
- What is the exact location of the casualty? (Tip: use your phone apps to find your location e.g. Google Maps)
- Your name and phone number (to call you back if required)
- The nature of the emergency (tell them what you think has happened)
A is for Airway
The casualty’s airway should be checked. This takes priority over any injuries.
Obstructions to the pathway to the lungs will restrict breathing. If possible, check the airway without moving the casualty.
If it appears there are obstructions in the casualty’s mouth, you may need to roll the person onto their side — carefully, with their spine, neck, and head aligned. This is known as the Recovery Position.
See our guide to placing a person in the Recovery Position.
Open the casualty’s airway by lifting the chin and tilting their head back. Look into the back of the throat to check obstructions, especially:
- The casualty’s own tongue, as it can fall back into the airway
- Regurgitation – stomach content rising into the esophagus but not being vomited
- Foodstuffs
- Loose dentures, mouth-guards
- Fluids, such as saliva, blood, mucus
- Foreign items
Clear any debris using your fingers, donning gloves if available.
Children should be managed as adults. A gradual full head tilt is recommended:
- Place your hand on the forehead
- Place your fingertips under the point of the casualty’s chin
- Gently tilt the head back and lift the chin to open the airway
For infants (under 1 year), maintain neutral head position/jaw support. Do not tilt the head back. Their softer trachea can distort and compromise the airway.
Also Read: E-Books: First Aid
B is for Breathing
Check that the person is breathing.
- Look to see if the chest rises and falls
- Listen at the mouth for sounds of a normal breath
- Feel for air against your cheek/li>
Look, listen, and feel for no more than 10 seconds to assess whether breathing is ‘normal’.
In the first few minutes following a cardiac arrest, the casualty may be taking infrequent, slow, and noisy gasps, gurgles, or sighs. This type of breathing is ineffective and should be treated as ‘not breathing’.
When the casualty is deemed as not breathing, you should immediately move to the next step C and send someone to find and fetch an AED.
If the casualty is breathing, place them in the Recovery Position and continue to monitor respirations until paramedics arrive.
Having made sure an ambulance has been called, continue to check the casualty’s condition. Observe and re-assess the casualty for continued breathing every 60 seconds.
While waiting for medical help to arrive, assess for injuries and treat them accordingly.
C is for CPR (Cardiopulmonary Resuscitation)
CPR should be performed straight away when a person is unconscious and not breathing.
With the person face-up, laying on their back, place the heel of your hand on the center of their chest, your other hand across the top of it.
Press down firmly to about a third the depth of their chest — about 5cm, or 4cm in the case of an infant.
Following 30 chest compressions, give 2 rescue breaths if you’re comfortable with mouth-to-mouth. To administer, tilt the person’s head back and lift their chin, pinch their nose, and place your mouth over theirs.
The compression ratio is 30:2 (30 compressions to 2 rescue breaths), which is approximately 100-120 compressions per minute.
Adults receive full breaths, shallow breaths for children, and just 2 puffs for infants.
Breaths are optional. If you’re not comfortable with mouth-to-mouth, stick to compressions.
Continue CPR until the casualty responds or until paramedics arrive to take over.
Also Read: Managing The Risk Of Sudden Cardiac Arrest
D is for Defibrillation
A defibrillator or AED (automated external defibrillator) is the next step if the person is still unconscious and not breathing.
This portable, compact, lightweight machine can ‘jump start’ the heart. When appropriate, it will automatically deliver an electrical shock aimed at restoring muscle contractions and returning the heart to its normal rhythms.
AED units come with pad electrodes, a battery, and an adapter, if applicable. Verbal instructions are inbuilt with most modern AEDs, making it straightforward to use the device correctly.
Often an AED will be located close by. They are to be found not just in hospitals, clinics, and ambulances, but also in many public places, including schools, shopping malls, libraries, airports, and offices.
At the scene of the emergency, you would probably need to ask a bystander to try to locate and fetch the AED. ( Facts about Automated External Defibrillators)
Assuming an AED is available, use it straight away, following its accompanying instructions.
Continue CPR and defibrillation until signs of life resume or until medical professionals arrive to take over.
If an AED is not locally available, the paramedics will arrive with one. Emergency first responders are typically equipped with and trained to use, AEDs.
Also Read: Tool Box Talk: Heart Risks: AEDs and CPR in the Workplace
When is DRSABCD used?
DRSABCD is intended to be used at the very beginning of the first aid process. It’s for assessing the situation and the state of the injured or sick person to decide how to proceed with first aid. The initial step – “Danger” – involves checking the area for dangerous conditions, both to determine what might have harmed the person and to avoid falling victim to the same hazard. You can’t offer first aid to someone if you become a casualty yourself!
DRSABCD covers the initial steps of rendering first aid right up to rendering CPR and potentially using an automated defibrillator (AED). Because it’s primarily focused on resuscitation, it doesn’t really address other aspects of first aid – such as tending wounds for a conscious person or handing over to emergency services. Rather, it’s a tool specifically to help someone know what to do if someone is unconscious and in need of CPR or Defibrillation.
Why is DRSABCD important?
When lives are in danger in a medical emergency, it’s not always easy to think clearly. It’s also easy to miss details and crucial steps in a process, or even suffer a mental blank, and simply not know what to do or how to start. A simple acronym like “Drs ABCD” can help you walk through the process and do each step at the right time. You don’t want to be halfway through attempting CPR and realise you’ve forgotten to call an ambulance, or check the area for live electrical wires.
Why do we use “DRSABCD”?
There’s a simple answer to that question and a more complicated answer. In simple terms, Drs ABCD is a simple way to remember a lot of information. That simple set of 7 letters helps people quickly recall quite a detailed process.
Alternatively, you might be wondering why we use “Drs ABCD” and not something a little more catchy (such as “DREAMS” – for “Danger, Response, Emergency services, Airways, Manual CPR, Start defibrillation”, for example). If so, you might need a slightly more detailed answer, which is that the acronym has evolved over the years.
Back when CPR was first becoming commonplace, the acronym “ABC” (Airway, Breathing, CPR) was introduced basically as a way to remind people to only start CPR when a casualty’s airways were clear, but they definitely weren’t breathing. Initially, it was used most often in hospitals. However, over time it became clear that other steps were needed in the process.
The “Dr” (Danger, Response) was one of the first modifications to the ABC protocol, encouraging people to ensure their own safety before applying first aid and obtaining consent where possible. This was more of a priority as members of the general public began using CPR at the site of an accident or injury. This was later revised to “Drs” to ensure people remembered to call 000 or otherwise send for help ASAP.
Also, as technology has evolved, automated defibrillators (AEDs) have become advanced enough for non-medical personnel to use and common enough that they’re frequently on hand. As a result, “Drs ABC” has now become “Drs ABCD” to remind first aid providers that AEDs are both available and effective for resuscitation situation.
As the acronym evolved, medical experts decided to leave the acronym as close to the original as possible to avoid confusing people in an emergency.
So although it might look hard to remember at first glance, DRSABCD – or “Drs ABCD” – is a valuable tool that has helped save many lives over the years.
also REad: AEDs: The Life-Saving Devices that Everyone Should Know How to Use
Disclaimer: This article is for informational purposes only. It does not constitute, replace, or qualify as any form of first aid training.
Also Read: Eliminate Arc Flash Hazards 4 Solutions
Download
Before you Leave do not Miss out free Download of the Infographic
Photo of the day: Learn the DRSABCD action Plan
More Photos
- What are the Best Practices for Managing Subcontractor Risk
- Photo of the day: 10 Essential Safety Tips for Driving in Hot Weather Conditions
- Photo of the day: best workplace safety tips
- Photo of the day: The Importance of Stop Work Authority in Maintaining Workplace Safety
- Photo of the day: Tomorrow’s Reward for Working Safely Today: Cultivating a Culture of Safety
- Photo of the day: Preventing slips and trips at work
- Photo of the day: Learn the DRSABCD action Plan
- Working with Electricity Electrical Accidents Guide for Electrical Workers
- Photo of the day: Hearing Protection Device Selection
- Photo of the day: If An Earthquake Shakes You-Infographic free
- Fire Safety Posters Free Download
- Photo of the day: First Aid for Electrical Burns-Infographic free
- Infographic: First Aid for Cuts and Scrapes free download
- Photo of The day: Work Safe with Lasers-Laser Safety free
- Photo of the day: Working Safely with chemicals and chemical Management
- Photo of the day: Safe work practices when using MEWPs ( updated)
- Photo of the day: Preventing Common Kitchen Hazards
- Photo of the day: Safe handling of Gas Cylinders and lecture bottles
- Photo of the day: Forklift Stability Triangle
- Photo of the day: Defective Tools Safe Work Practice
- Photo of the day: Lift With Your Legs Not With Your Back
- Photo of the day: First Aid for burns
- Photo of the day: The 7 Principles of HACCP
- Photo of the day: Working Safely with Suspended Loads
- Photo of the day: Heat Stroke First Aid and safety posters
- Photo of the day: Near-Miss Reporting and Posters
- Photo of the day: Ergonomic chair and office chair safety tips
- Photo of the day: Whole Body Vibration
- Photo of the day: Substation Safety Equipment
- Photo of the day: Bypassing Safety Controls Rules
- Photo of the day: Lightning Safety Tips
- Photo of the day: Overhead Power lines Clearance
- Photo of the day: Floor Marking
- Photo of the day: Types of Foot Protection
- Photo of the day: Types of Hand Protection
- Photo of the day: Lockout and Tagout Safety
- Photo of the day: Fall Protection Plans
- Photo of the day: Flood Safety Tips
- Photo of the day: Read All Labels Work safe
- Photo of the day: Run Project safely with Crane Hand Signals
- Photo of the day: Flagman and Traffic control
- Photo of the day: Managing Risks of Exposure to Solvents in the workplace
- Photo of the day: Scissor Lift Safety
- Photo of the day: HSE Bulletin Board
- Photo of the day: Arc-Fault Circuit Interrupters (AFCI)
- Photo of the day: Safe use of ladders and step ladders
- Photo of the day: Concrete Truck Driver Hand Signals
- Photo of the day: Extension Cord Safety Tips
- Photo of the day: Protect your Head
- Photo of the day: choosing the right Anchorage
- Photo of the day: Work-Related Asthma
- Photo of the day: Top FIVE Heavy Equipment Construction Site Safety Tips
- Photo of the day: sun safety in the workplace
- Photo of the day: Cannabis and Impairment in the Workplace
- Photo of the day: Position for safety and comfort-Safety Tips
- Photo of the day: Generator Safety
- Photo of the day: Controlling COVID-19 in the Workplace-Physical Barriers
- Photo of the day: Manual Material handling
- Photo of the day: Personal Protective Equipment last resort
- Photo of the day: WHMIS 2015 – Pictograms
- Photo of the day: Indoor Air Quality
- Photo of the day: Noise in the affected workplace
- Photo of the day: Fatigue at Work
- Photo of the day: Don’t be Driven to Distraction
- Photo of the day: working in heat and Humidex Rating
- How to use Plate Clamps Safely: Safety Moment#34
- Photo of the day: Sitting at work
- Photo of the day: 5 ways to reduce the risk of Slipping and Tripping
- Photo of the day: Preventing the spread of contagious illness
- Photo of the day: Incident Investigations
- Photo of the day: 10 Scaffold Safety Essentials
- Photo of the day: Effective Health and Safety Committees
- Photo of the day: New worker Orientation & Safety Orientation checklist
- Photo of the day: Workplace Inspection
- Photo of the day: musculoskeletal disorders
- Photo of the day: Emergency preparedness in the workplace
- Photo of the day: Mental health in the workplace
- Photo of the day: Trenching Safety Tips That Can Save a Life
- Photo of the day: Dangerous Goods Classes
- Photo of the day: Safety Equipment for Confined Spaces
- Photo of the day: Tips to reduce Heat stress in the workplace
- Photo of the day: hierarchy of controls
- Your steps to chemical safety
- H2S Gas and how to handle its Emergency
- Photo of the day: Importance of Mock drill and Fire Action Emergency Procedure
- Photo of the day: Choosing the Right Face Mask and the difference between a respirator and face mask
- Photo of the day: Confined space safety Precautions
- Breath Safely: The Proper Use of Respiratory Protection
- Photo of the day: Electric shock survival
- Photo of the day: Chemical Spill Emergency Response
- Photo of the day: Construction Site fire Safety
For Many Safety Resources please visit SAFETY BAG