Ladder Inspection Form
10 min readThe first step in ensuring that roofing professionals utilize ladders safely and effectively on the Jobsite is to provide training on the essential components of ladder use. In fact, ALI notes that 76 percent of companies believe ladder accidents that occurred in their workplace could have been avoided with ladder safety training. When roofers feel confident in climbing and working on a ladder, they can protect themselves and promote a culture of safety among other professionals.

Ladder safety training sessions can either be conducted online or in-person on a Jobsite. While online training provides greater accessibility and convenience, an onsite training session offers the ability to demonstrate real-world examples by job application and explore trade usage scenarios. Equipment manufacturers and various national organizations provide free ladder safety training in both formats. For example, OSHA conducts hundreds of ladder and fall protection safety training sessions every May as part of its National Safety Stand-Down initiative. Typical training for Jobsite participants may include topics such as:
- Safety protocols by the application.
- How to safely climb and work for extended periods from a ladder.
- Common dangers posed by improper ladder use.
For a quick refresher or reference tool, take a look at the right and wrong ways to use a ladder. Even commonsense reminders can prevent workplace injury.
Using a Ladder the Right Way
- Prior to using a ladder, be certain that it is on a completely flat surface to prevent tipping.
- Center your body on the ladder and keep your waist between the rails while maintaining a firm grip on the ladder.
- Climb facing the ladder, move one step at a time, and firmly set one foot before moving the other one. This is important to remember on your descent as well don’t take any shortcuts to get down quicker.
- If possible, have one person hold the ladder at the bottom while another person performs the task.
- Move materials with extreme caution so as not to lose your balance or tip the ladder.
Using a Ladder the Wrong Way
- Don’t stand above the fourth rung from the top of an extension ladder. This is very important as you can easily lose your balance and fall.
- Don’t climb a ladder if you are not physically and mentally up to the task.
- Don’t place the base of an extension ladder too close to, or too far away from, the house/building.
- Don’t over-reach or lean to one side.
- Don’t try to move a ladder while on it or from above. Climb down and then reposition the ladder closer to where you are working.
- Don’t exceed the maximum weight of a ladder.
- DO NOT permit more than one person on an extension ladder.
Ladder Inspection Checklist
Many roofers feel confident operating a ladder to perform their job duties. However, many take for granted the state of the equipment itself. Ladder inspections are just as important as general ladder use training. Both roofers and contracting business owners should know how to properly inspect all climbing equipment prior to each use.

While there are many ladder styles and models, there are several aspects of a safety inspection that apply to every ladder. The following should always be inspected before climbing a ladder.
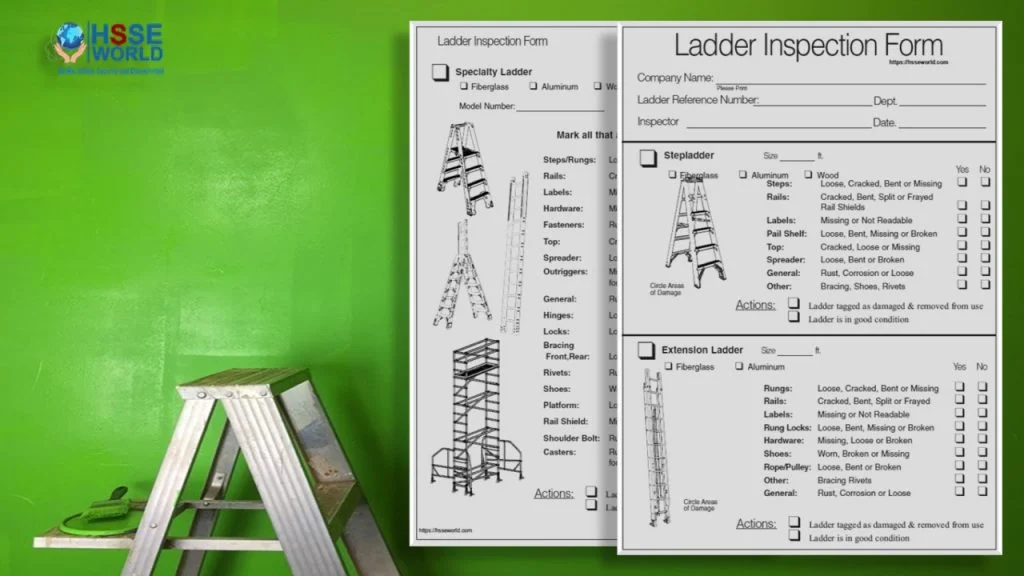
1. Steps: Inspect each step of the ladder to search for cracks in the material, looseness between the step and the body of the ladder, missing pieces of hardware such as screws and bolts, or any missing steps.
2. Rails: Inspect each rail of the ladder for cracks in the material, frayed rail shields, or bent angles. These are indicators of compromised stability.
3. Labels: Ensure the ladder still has labels that are legible. Labels will often list important user information, such as the load capacity for the climber and their materials, directions for climbing safely, as well as any compliances with OSHA or the American National Standards Institute (ANSI).
4. Material quality: Ensure the ladder’s material is in good condition. Check for corrosion, rusting, or any loose parts, which can pose a danger to the user if left unchecked.
5. Hardware: Check to see that all bracing, shoes, and rivets on the ladder are uniform and securely placed.
Each item on this five-part checklist can be inspected with a quick and thorough scan. If any of these five aspects of a ladder are not secure and sound, a ladder is not fit for climbing and should be immediately removed from service until it is either repaired or permanently discarded.
It’s also important to understand the unique aspects of ladders that are frequently used on the worksite. The most common types of ladders chosen by roofing professionals are stepladders, extension ladders, and podium ladders, which all pose various benefits and have notable differences in their construction. Below are important attributes to check for each ladder style. A sample ladder inspection form is shown in Figure 1. To find ladder inspection forms tailored to your exact ladder model, visit your manufacturer’s website.
Stepladders
1. Top: Check the top of the ladder for any missing hardware or looseness. Many roofers rest tools and equipment on the top of the ladder, which may become damaged over time.
2. Pail shelf: Some roofers choose to add a pail shelf to their ladder, which can hold a bucket for tools and materials. Inspect the shelf to make sure it is properly secured to the ladder, doesn’t contain any material cracks, and is not bent out of shape.
3. Spreader: Look at the spreaders to make sure they are not loose, bent or broken. They should smoothly unfold when the stepladder is placed in an open position.

Podium Ladders

1. Platform: Inspect the platform to be sure it does not contain cracks, does not have missing hardware, and is not bent out of shape. The podium often carries most of the weight of the user, so be aware of any damages in the material.
2. Spreader: Similar to a stepladder, be sure to inspect both the top and the spreaders of the podium ladder.
Extension Ladders
1. Rung locks: The rung locks on an extension ladder are essential to maintaining structural integrity while climbing. Inspect these pieces to make sure that they are not loose, bent, missing, or broken.
2. Shoes: Take a look at the shoes of the extension ladder to see whether they are worn, broken or missing. The shoes may experience significant wear over time, as they support the weight and position of the ladder.
3. Rope/pulley: Ensure that the rope is not frayed or damaged and make sure the pulley is not loose, bent or broken before climbing.

(learn more:portable-ladder-safety).
Products That Improve Roofing Safety
While ladder inspections will protect against equipment failure, safety accessories can complement these efforts and provide additional safety measures by making ladders more stable and secure. To combat the possibility of slips and falls from ladders, especially in rainy weather, manufacturers now offer ladders with slip-resistant treads on ladder steps and non-marring rubber foot pads to maximize a ladder’s ground contact.
Roofing professionals working at the edge of a low-height roof may consider utilizing a podium-style ladder with an extra-wide platform step to support a greater range of motion and stability while working. Hardware enhancements, such as shatter-proof locks and sturdy latch designs, enhance the durability of the equipment. A ladder leveler is another accessory that can help prevent accidents. It attaches to the bottom of a ladder and helps provide an evenly supported working surface when working on the sloped ground or a staircase.
Use of Fall Protection Equipment and Ladders
Roofing professionals may find themselves using fall protection equipment in tandem with extension ladders as they transition from standing on a ladder to standing on a roof. This is especially the case with high-sloped roofs, which require additional safety protocols to reduce the risk of injury.
OSHA specifies that a professional working on a steep roof must be protected by a guardrail system, safety net system or personal fall arrest system. When on a low-slope roof that features an unprotected edge 6 or more feet above a lower level, professionals must use fall protection. Below are three common scenarios in which roofers should consider using fall protection equipment.
When standing next to:
1. An unprotected edge — any side or edge (except at entrances to points of access) of a walking work surface where there is no wall or guardrail system of at least 39 inches.
2. A leading-edge — the edge of a floor, roof, or deck, which changes location as additional floors, roofs, decking, or sections are placed, formed, or constructed.
3. Holes — including skylight roof openings.
(Learn more:when-your-job-takes-you-to-the-edge).
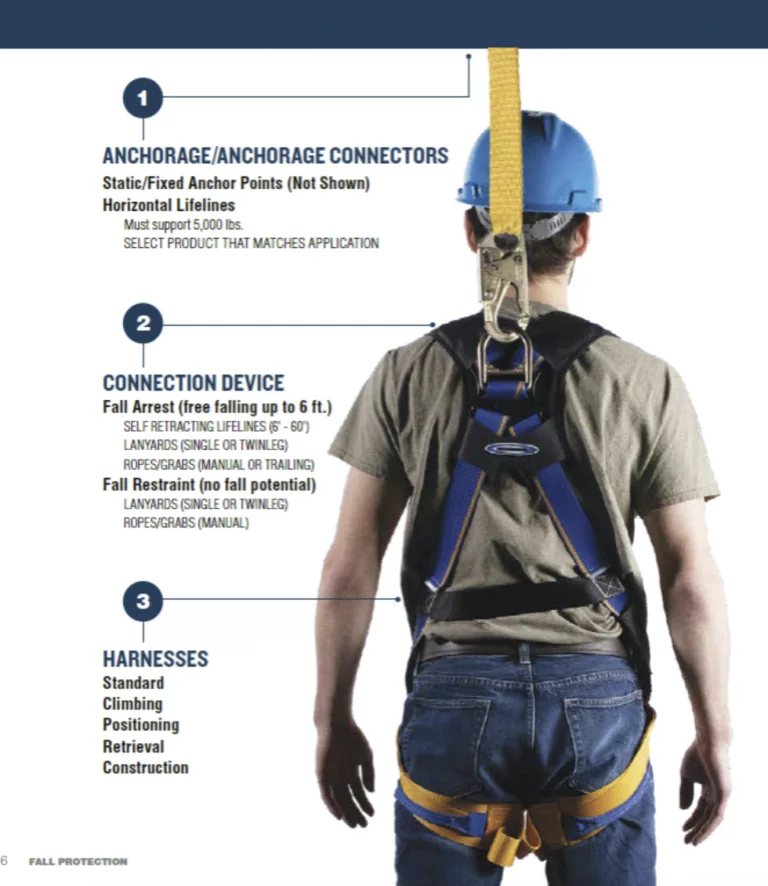
Just as it’s important for roofing professionals to be trained in proper ladder use, fall protection training carries the same weight. All roofing professionals should have an understanding of the primary components of a secure fall protection system and how they work in tandem to ensure a user’s safety. The graphic in Figure 2 demonstrates the correct positioning of a fall protection anchorage, a connecting device, and a harness.
Fall Protection Inspection Checklist
Just like ladders, fall protection equipment should be inspected by the user before every use, as broken or degraded equipment will not ensure the user’s safety. When inspecting a harness, it’s important to watch out for the following five items:
1. Fraying in the material.
2. Significant discoloration of materials (especially around clasps and joints).
3. Rusting of metal appliances.
4. Missing rings and buckles.
5. Excessive dirt or grease (this can be removed with warm, soapy water).
If any of the above items are found, the harness should not be used. It should be immediately taken out of service and removed from the Jobsite. It may sound obvious, but simply wearing fall protection gear — even gear that passes your checklist — doesn’t automatically protect the user. Proper positioning must also be inspected after the worker has put on the harness. Roofers can self-inspect or use a buddy system to ensure maximum protection.
(learn more:how-to-inspect-your-fall-harness-when-working-alone)
1. Make sure the harness’s centered chest strap has been properly fitted and routed. The chest strap should always be located at the sternum. Loose straps can cause injury, and the mispositioning of your straps could result in gear failure.
2. Connecting devices must be self-locking and closing, require a minimum of two separate steps for release and a 5,000-pound minimum breaking strength.
3. Always use a 3-foot lanyard and ensure your vertical lifelines are above the D-ring or adjusted for safe reach as you move.
Create Your Own Culture of Safety
In a high-risk profession like roofing, a commitment to safety is essential. This often begins and ends with equipment use training, which educates workers on the proper way to use a ladder or fall protection equipment. While this is an essential step in creating a safe environment, both business owners and roofing contractors can take safety a step further by introducing equipment inspections as a part of your job site protocols. Taking the time before each use to scan equipment for flaws has the potential to save lives.
Be sure to include inspections as part of your next safety training and consider printing off these important safety checklists to keep on hand. While roofing professionals may face many hazards at work, the one thing that can be controlled is your commitment to equipment safety.
Download the Checklist
More Forms
- Camp Inspection form
- Machines Access Control Inspection Checklists
- Lift Plan Form
- Slips,Trips and Falls checklist
- Emergency Drill Table Top meeting Form
- Emergency Drill After Action Review form
- Compressed Gas Cylinders Access Control Inspection Checklist
- Competent Person Designation form
- Contractor Weekly HSE Report Form
- Safety Inspection Form
- Incident Report Form
- Job Hazard Analysis form
- OSHA Inspection Checklist 8-Pages
- Process Safety Management (PSM) Compliance checklist
- Portable Ladder Self Inspection checklist
- Scaffold Register and Inspection Checklist
- CRANE INSPECTION REPORT
- Laboratory Inspection Checklist Form
- Electric Arc Welding and Cutting Checklist
- Crane Suspended Personnel Platform (MANBASKET) Permit
- Pressure Testing Checklist
- Hygiene and Sanitation Inspection Checklist
- Permit to Work (PTW ) AUDIT CHECKLIST
- Equipment Safe Operating Procedures- SOP 61 checklist
- Construction safety Inspection checklist
- Fall safety at construction checklist
- Contractor Pre-qualification Questionnaire Checklist
- Lifeline & Harness Inspection Guide checklist
- Templates: Management of Change NEW Modified Equipment Safety Checklist
- Lock Removal Form
- Workplace Safety Inspections Forms
- Safety Templates: COVID-19 Safety Plan
- Construction Site Traffic Management Plan (CSTMP) Guidance
- Fire Pump Daily Inspection Checklist
- Health Safety at Work Improvement Action Plan
- Work at Height Checklist
- Canteen Inspection Checklist
- Electrical Isolation Permit to Work forms and checklist
- Job Safety Analysis (JSA) Forms What’s Right and Wrong?
- Lifting Plan Audit Checklist
- ISO 45001:2018 READINESS CHECKLIST
- Workplace Housekeeping Checklist
- Hazard Identification Checklist
- Free Pre-Startup Safety Review Checklist (PSSR)
- Ladder Inspection Form
- Hazard Identification Plan (HIP) Template
- HIRA, HSE Hazards & Effects Management Process (HEMP) & Risk Register Template
- Temporary Construction Facilities (TCF) Inspection checklist
- Simultaneous Operation (SIMOPS) checklist
- Mobile Scaffold Inspection checklist
- Annual Internal Audit Form
- General Safety Guidelines and Employee Acknowledgment form
- E-Books: Fire Safety Logbook templates
- Electrical Inspection Checklists
- Grating-Decking-Floor- handrail-Removal Form
- Photo of the day: New worker Orientation & Safety Orientation checklist
- Suspended Scaffold Pre-Operation Inspection Checklist


