The proper and safe operation of cranes mainly falls to the operator. This means that both operators and managers must understand crane load charts. Foremen, along with other managers, need to not only understand the charts but be able to use them to plan the lift and make sure the loads are positioned in a way where the equipment can lift the load safely and move it where it should go.
One example of this is if you have a truck full of pipe located too far from the crane being used. If this is the case, it may not be safe to lift the pipe from the truck and place it in or next to the trench.
In addition to safety, there are several other reasons you need to know how to read and use the crane load chart.
In this article you will be able to learn the following :
- The importance of load charts
- The information found on a load chart
- How to determine gross and net capacities
- How to calculate the total load
- How to identify structural and stability values in load capacity charts
- How to identify quadrants of operation from load chart data

The Importance of Crane Load Charts
A crane load chart is a vital tool that managers and operators need to understand fully. With this knowledge, they can safely operate any crane while ensuring the safety of others on the worksite.
Understanding the Crane Load Chart is Mandated by OSHA
According to the OSHA Crane Standard – subpart N mandates that all crane operators be certified. To pass the certification, operators must demonstrate their ability to use modern load charts. This is necessary for each crane type the operator is using.
Load Charts Ensure Proper Use and Safe Operation
Crane load charts are unique from the backhoe and excavator load charts. While the basic concepts are similar, there are some essential differences.
For example, the closer a crane is located to the load, and the higher the boom angle is, the more lifting capacity the crane has. This rule isn’t always applicable to excavators.
Before making a lift safely, the operator needs to know the load’s weight and how far the load is from the boom’s turntable. This is called the load radius. If the load is being lifted from a point that is higher than ground level, knowing this height is also necessary.
The use of a crane load chart makes this easier. With this, an operator can figure out the angle the boom needs to be at to make sure they are positioned directly over the load. Before lifting the load, operators must check the boom angle indicator, which provides the boom angle from the horizontal.
Mobile Cranes: Basic Terms You Should Know
Avoid Injuries and Liabilities
Injuries and liabilities are serious issues on any construction site. This is exacerbated when cranes are used.
Understanding how to safely use a crane load charge reduces the possibility of these issues. If operators are unclear on the purpose of these charts or the purpose they serve, serious problems may arise.
How to read a Crane Load Chart
A crane load chart is the most important resource a crane operator should know for ensuring crane safety, and for determining what a particular crane is capable of lifting. With all of the different crane manufacturers out there, it is imperative that the crane’s load chart be well understood. Whether you are operating a boom truck such as a Terex, National, Manitex, Pioneer, or Altec, a rough terrain crane such as a Grove, Link-Belt, Manitowoc, Kato, or Tadano, it is important to keep in mind that though many cranes have similarities in their load charts, they also have many differences. Ignoring these differences may lead to the overturning or structural failure of the crane.

This chart illustrates the gross or rated capacities of a crane. The numbers on the top row represent the boom lengths of the crane
The numbers in the left column represent the operating radius
Loaded boom angle (means the boom’s angle and radius is being measured with the boom loaded with the weight indicated in the chart)
The gross capacity of this crane can be determined by either following the radius column and interesting boom length or following the boom angle column and intersecting the radius or boom length column.
The “Stowed jib deductions” row is what you would deduct if the jib was stowed on the base of the boom for the particular boom length.
Let’s make use of one of the all-terrain 200T cranes as an example:

This is an example of a 200T Liebherr crane load chart.
- 200T is the gross capacity which is the tonnage it can lift, but its actual load capacity is referred to as the net capacity.
- The top line refers to the lengths of the boom available for the crane type
- The numbers in the far-left column, represent the operating radius in meters, or the turning ability which the mobile crane can turn and operate in
- The numbers in the chart (left to right) represent the weight of the lift i.e. at what weight can the boom lift when considering the correct boom length and operating radius
In summary, one must first identify the length of the boom that is required for the job and correlate it to the operating angle that can be achieved on-site. Find the corresponding load rating and this provides the crane’s lifting capacity.
Using the chart as an example: The lift of the load is 20T and the site indicates that we have only 26m to operate within – what is the length of boom that we would require from the 200T crane to execute the job accurately? Answer: 40.3m.
Gross Capacity Versus Net Capacity
The capacities listed in a crane load chart are not the actual loads that can be lifted on the hook.
The values given in the charts are “Gross Capacities” or “Rated Capacities”. The actual load the crane can lift is referred to as the “Net Capacity”. The maximum load must never exceed the crane’s Net Capacity!
The Gross Capacity must include the weight of anything and everything that is mounted or stowed on the boom of the crane or hanging from the boom tip.
These are called “Capacity Deductions”.
Capacity Deductions:
- Weight of the main load block
- Weight of the Headache ball or overhaul ball
- The effective weight of Jib (Stowed or erected and not used)
- Weight of all hanging cable
- Weight of all rigging
- Weight of Load
Remember there are many variations, depending on the manufacturer of the crane. Make sure to understand what the manufacturer determines are capacity deductions.
GROSS CAPACITY – CAPACITY DEDUCTIONS = NET CAPACITY
the following are an example of capacity deductions in the crane’s load chart. These items represent the amount of weight you would deduct from the gross capacity to determine the net capacity.

Jib Capacities

The gross capacities in the crane chart below are to be used when lifting with either the 24ft or 40 ft jib. By selecting the jib and the boom angle you will be able to determine the gross capacity lifting on the jib. Whether you are using a Grove load chart, a Terex load chart, or a Link Belt load chart you might see different terms used for the boom extension. Manufacturers refer to the pinned boom extension on their crane chart as a jib, fly, or boom extension. These are pretty much the same things, they just could not agree on a name. This crane load chart on the left is a typical load chart for a Link-Belt to use when you are lifting with the fly. Even though these important items for cranes have many other uses, keep in mind the primary purpose of a jib, fly, or boom extension is to increase the overall height a load may be lifted.

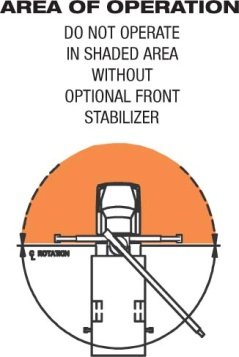
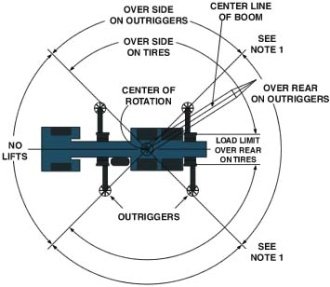
Area of Operation
| Item Required by ANSI B30.5-1.1.3 Load Rating Chart and OSHA 1926.1433. The work area diagram (chart) identifies operational quadrants and must clearly indicate the areas where no load is to be handled. This chart also shows how the manufacturer separates the different working areas of the crane. It is always necessary to get familiarized with the specific load charts of the crane prior to operating since each work area diagram is specific to the crane model and mounting configuration. Examples of different working area diagrams are shown below: |

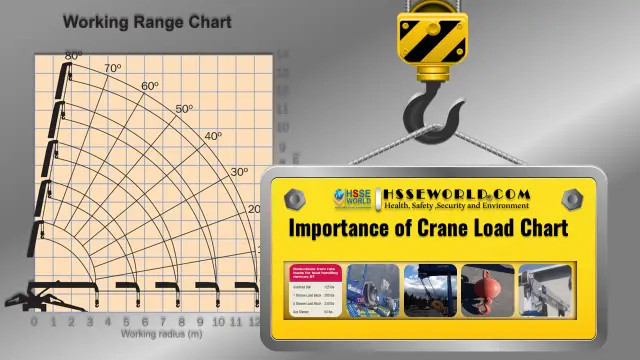
Range Diagram
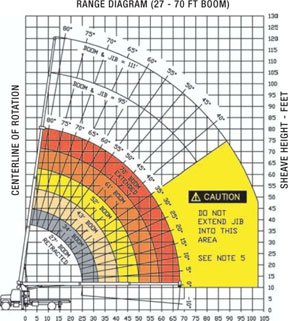
These diagrams assist a crane operator in determining the most appropriate configuration and positioning of the crane. This diagram will show the boom length needed to pick up and lift a load. The range diagram is also helpful when setting up near structures. When deductions for the wire rope are required, a good place in the load chart to assist in making calculations for this would be the working range diagram.
The working range diagram to the right is separated into:
- Load radius (vertical lines)
- Boom tip height (horizontal lines)
- Boom jib length (arched sections)
- Boom angles (angled lines)
- Caution area (prohibited area)
Outrigger / Crawler Extension
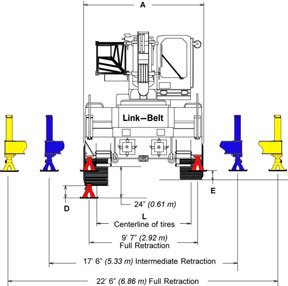
Many cranes have load charts that only have capacities listed for operations on outriggers fully extended and set. However, this particular crane chart has an option of lifting:
- On tires
- Outriggers fully retracted
- Outriggers fully extended
- Outriggers intermediate extended
Using less than fully extended outriggers can be essential in confined spaces. However, the crane will be substantially less stable. The wider the crane’s stance, the further to the tipping axis, the more stable the crane. Some crawler cranes have the ability to extend their tracks and widen their stance to improve the stability of the crane when working over the sides

Counterweights

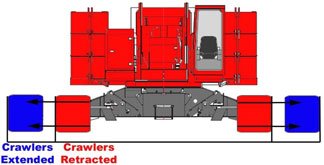
Some crawler crane load charts also have different capacities for crawlers retracted and crawlers extended. Like outriggers the farther the tipping axis the more stability.
Many cranes especially boom trucks do not come equipped with a counterweight. Some cranes come with a standard counterweight. However, some cranes load charts such as this Link-Belt mobile crane have variable counterweight configurations. This allows the carrier to travel with a lighter load to comply with weight restrictions on public roads by not hauling the extra weight around. Or work in places such as bridges where the extra weight of the crane is a factor. More counterweight will give you more capacity. For the sake of crane safety operating a crane over the side without the outriggers properly extended can lead to loss of backward stability with the counterweights installed.
Stability (Tipping) vs. Structural Strength
Tipping Capacity /Stability
This limit is based on the stability of the crane or the weight necessary to tip the crane over. Tipping capacities are below the bold lineIt is of the utmost importance to determine which limit you are using. Each load chart will have a way to distinguish the difference between the two.
Structural Strength
This limit is based on the actual strength of the material, boom, jib, etc. Structural capacities in a load chart are distinguished by:
Shaded area, above a bold line, in bold type or marked with an asterisk *
Factors That Reduce Load Capacities Production Operations
Full load chart ratings may not apply when certain operations are being done:
- Pouring Concrete
- Steel Erection
- Dragline, magnet, clamshell work, etc.
SWING RATE:
Starting and stopping the swing to rapidly and will cause a side loading condition
INCREASE IN LOAD RADIUS:
When the load is applied the boom deflection will cause the load to drift away from the crane, increasing the load radius
SIDE LOADING:
Crane booms are designed for maximum strength downward not to the side. This is strictly forbidden by the manufacturer.
UNLEVEL CRANE:
All load charts are based on the firm-level ground, Below is an example of possible capacity loss due to the crane being unlevel
( Read more: Guideline for Crane Stability and Ground Pressure )
Conclusion
There are varying types and sizes of mobile cranes. All cranes are obviously designed to perform a function but, each crane will have its specific load capacity. The load requirement is a crucial component when identifying the specifications of a job and this is when a load chart can be used as an accurate means of assisting in one area of determining which crane should be used for the lift. So, the question is how do you read a crane load chart to help you make an informed decision about which crane to hire for your project?
Mobile cranes are large pieces of equipment that need to be operated safely, accurately, and within their capabilities. It is therefore imperative that the site supervisor and project manager use a crane load chart before ever quoting a client or sending the crane to the site. It is not for the operator to determine when the crane is on-site.