Lifting Accessories and equipment are marked for a variety of reasons, the most important of which is to give it a unique identity (ID). The ID mark is the link between the item and the documents recording its initial certification and in-service inspections. The initial certification will depend upon local regulations.
Manufacturing standards usually require the manufacturer to mark certain information about lifting accessories; this will include the WLL* and a batch number, as a minimum, however, some items are manufactured in large batches and every item in the batch bears the same ID, so there is a need for additional marking to make the ID mark unique. Also, some items such as eyebolts and shackles may have been in use for a long time and may pre-date existing local regulatory requirements for identification and marking, and retrospective marking may be required to bring them into compliance with company requirements.
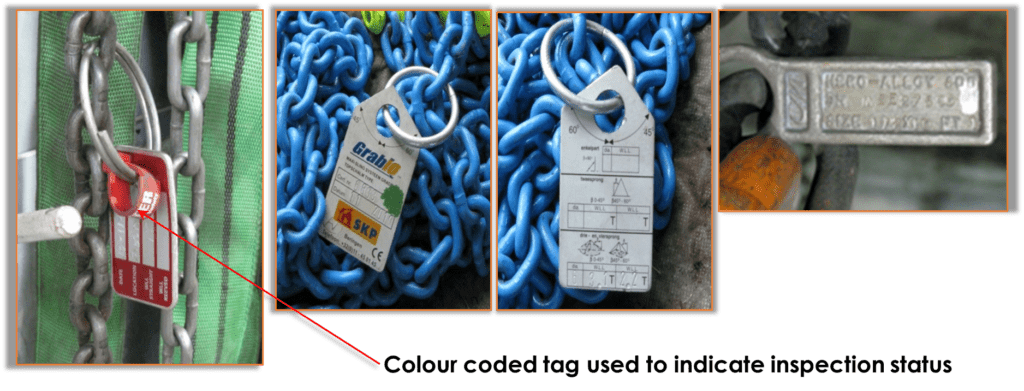
As well as adding a unique ID there is also a need to provide an indication as to whether the item is within a current inspection period. Various designs of tags are available as an alternative to or for use in combination with color codes to provide the requisite identification. However, tags on some items can get in the way of use and soon be lost, accidentally or otherwise (e.g. sometimes tags are removed on site when working on Gas Turbines in case they become detached and fall into the GT) which is one reason why it is important to uniquely identify the item so that the inspection status can be re-established. In some applications, they may even be a hazard. It is therefore a matter of choosing the most appropriate method for the item and the environment in which it is being used. Probably, a combination of methods will be required. This article gives examples of best practices observed and implemented (and some proprietary solutions) that will meet standard and lifting requirements for providing identification and traceability of lifting accessories.
Also Read: Lifting Calc 3: Safety APP for Lifting Accessories

General
Lifting operations are a recognized high-risk activity and unfortunately reason for a considerable number of accidents. The safe functionality of the lifting equipment (cranes ) is crucial to keep the time schedule and to avoid damage to precious equipment or injury of personnel or loss of life. This guidance document therefore also provides additional guidance for the inspection of cranes.
*Note: European and USA standards now tend to refer to WLL (Working Load Limit), for the purposes of this guidance article WLL will be used but for all intents and purposes WLL is interchangeable with the term SWL (safe working Load). Working Load Limit / Safe Working Load
The Safe Working Load is a generic term that identifies “The maximum load (as certified by an independent competent person) which an item of lifting equipment may raise, lower or suspend under particular service conditions”
The Working Load Limit (WLL) is a generic term that identifies the specific engineered designed use of that piece of equipment. “The maximum load which an item of lifting equipment is designed to raise, lower of suspend”. It must be noted that reference must be made to the various manufacturing standards for each specific type of accessory. Below is a list of the WLL that must be marked on various items in accordance with European Standards, the effective WLL for accessories used in different configurations may be obtained from tables/formulae in the respective standards (see fig. 3 for example):
- Maximum mass that an eyebolt is authorized to sustain along its centerline axis in general lifting service [EN 3266]
- Maximum mass that a shackle is authorized to sustain in general service [EN 13889]
- Maximum mass which the sewn webbing component of a flat woven webbing sling is designed to sustain in straight pull and which a sling or sling assembly is authorized to sustain in general lifting service [EN 1492-1]
- Maximum mass which a roundsling is designed to sustain in straight lift and which a sling or sling assembly is authorized to sustain in general lifting service [EN 1492-2]
- Maximum mass which a [wire rope] sling is authorized to sustain in general service [EN 13414-1]
- Working load limit (WLL) of a chain sling: The maximum mass which a sling is authorized to sustain in general lifting service [EN 818-4]
Also Read: What Should I Look for to Make Sure My Harness Is Safe for Use?
Marking and Identification of lifting Accessories
1- Chain Slings
General-purpose chain slings are usually manufactured to order from standard components and the complete assembly is marked with a robust metal tag attached to the master link. As this is a relatively soft non-load bearing material it can easily be stamped with all the necessary information. However, tags can become detached so it is a useful precaution to mark the side of the master link with the ID. In the event of the tag being lost, it will provide traceability back to the documentation from which all other information can be recovered:
2- Flat Webbing Slings and Roundslings:
*Some users write directly onto the webbing or the cover of the sling. There is some concern as to whether or not this practice is safe due to the potential of the solvent in the marker pen to cause damage; however, there is no definitive proof as to whether or not this is the case. Examination of sample slings marked in this way has not revealed any signs of damage but that is no guarantee that it will not occur with every possible combination of pen and material types. This practice is therefore discouraged unless tests have been made to check for damage. Certainly, paint must never be used because, in addition to the possible chemical reaction, it will glue the fibers of the material together and prevent them from flexing.
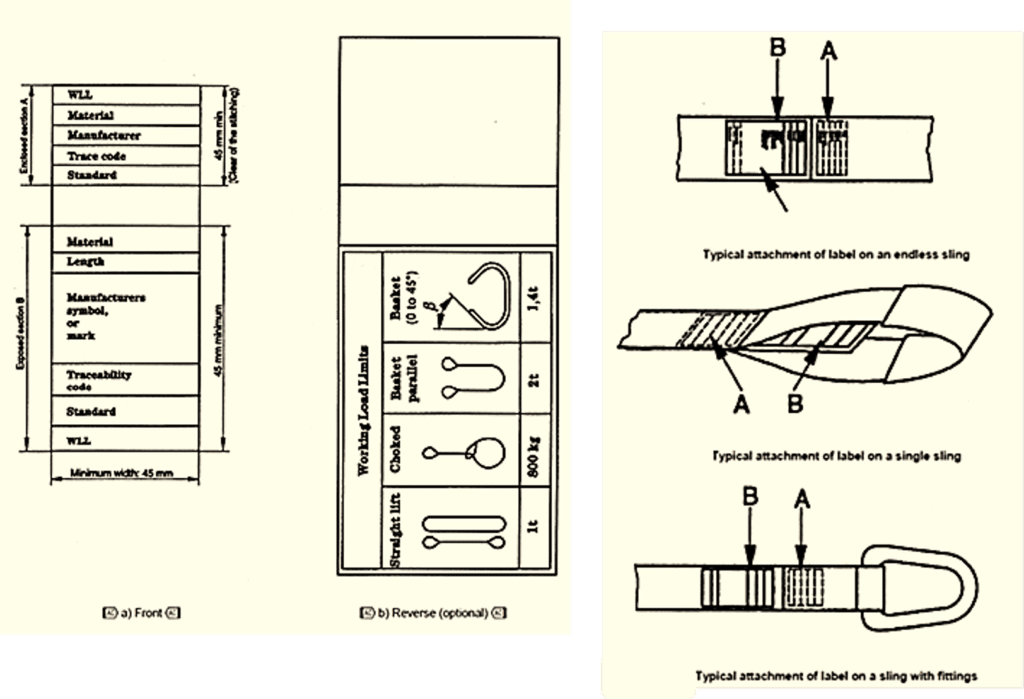
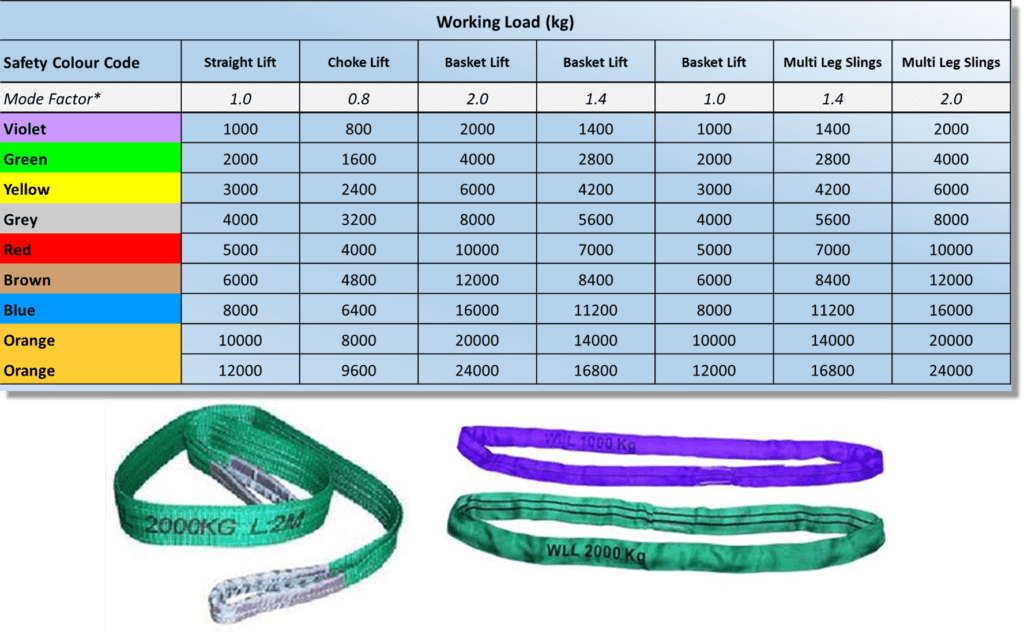
Flat Webbing and Roundslings may be purchased already colour coded with respect to their WLL when purchased to EN 1492. The WLL is also pre-printed on the sling (See figure 3).
Where additional means of identification are required the use of tags is an option:

Fig 4: This method uses a proprietary tag, purchased with the sling, to identify the WLL and the certificate number / unique ID, in conjunction with a green colour coded tag to indicate the inspection status

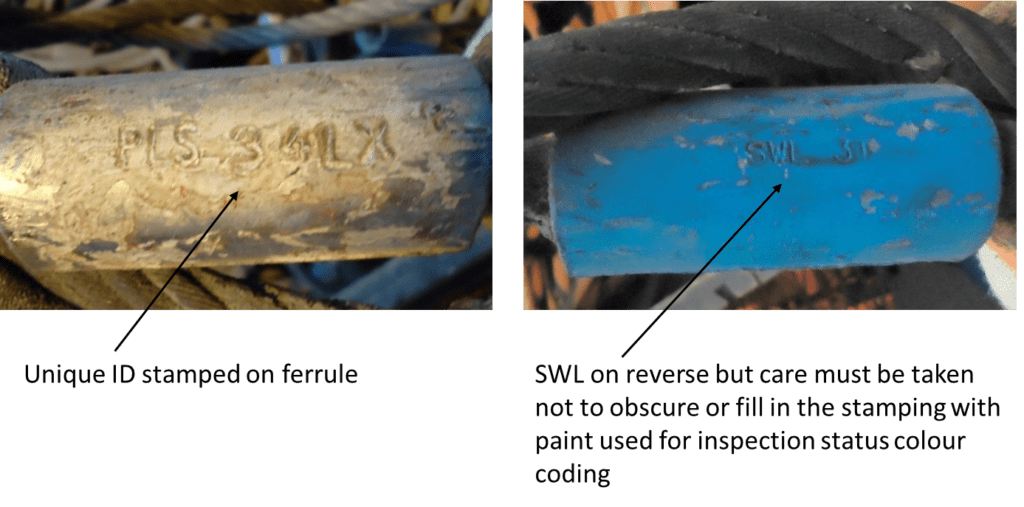
Fig 5: This plastic tag is used for unique identification of the wire rope sling, to supplement the hard stamping of the WLL on the ferrule (but it could easily be added to the tag). Coloured paint is used to control inspection status

Fig 6: A combination of cable ties has been used here to uniquely identify the roundsling (Black – one digit is just visible at the top of the tie) and the Inspection status (Green). Care must be taken not to apply the cable ties too tightly; otherwise, a stress point/overload point could be created by restricting the movement of the fibers

Fig 7: The approach taken here for safety harnesses could also be used for slings.
A proprietary tag is used for the identification of SWL and/or inspection status. Removal of the slip-in disc prohibits use of the item, in the same way as a scafftag.


Fig 8: Another product on the market is a soft plastic label in the shape of a small spade; the flat part has space to mark information
3- Wire Rope Slings
Industrial wire rope are usually manufactured with secured eye terminations of either Talurit ferrule as below pic or tapered ferrule. Single-leg slings are marked by stamping directly into the ferrule. This is a circular section so the stamps should not be too large. Aluminum ferrules are quite soft and a large stamp applied with a heavy hand can result in a very deep impression and considerable local damage. Multi-leg wire rope slings are marked by a tag similar to that used for chain slings. Some of the more robust tags shown in section 4.2 could also be used for wire rope slings
In certain countries, it might also be necessary to add regulatory mandatory marking, e.g. CE marking as defined in the applicable European Directive Best industry practice is to apply the paint to the opposite end ferrule from the stamped end; the WLL end is connected to the hook and the colour coded end is applied to the load
4- Eyebolts and Shackles
Manufacturing standards typically require the following information to be legibly and indelibly marked, on eyebolts and shackles, in a manner that will not impair the mechanical properties:
- the manufacturer’s identification mark or symbol
- working load limit (or SWL) e.g. 2,5 t
- the traceability code to enable any particular eyebolt/shackle or batch to be identified with the manufacturer’s certificate
- the nominal size i.e. nominal diameter of the thread (eyebolts)
- the grade (usually shackles)
- In certain countries, it might also be necessary to add regulatory mandatory marking, e.g. CE marking as defined in the applicable European Directive(s)
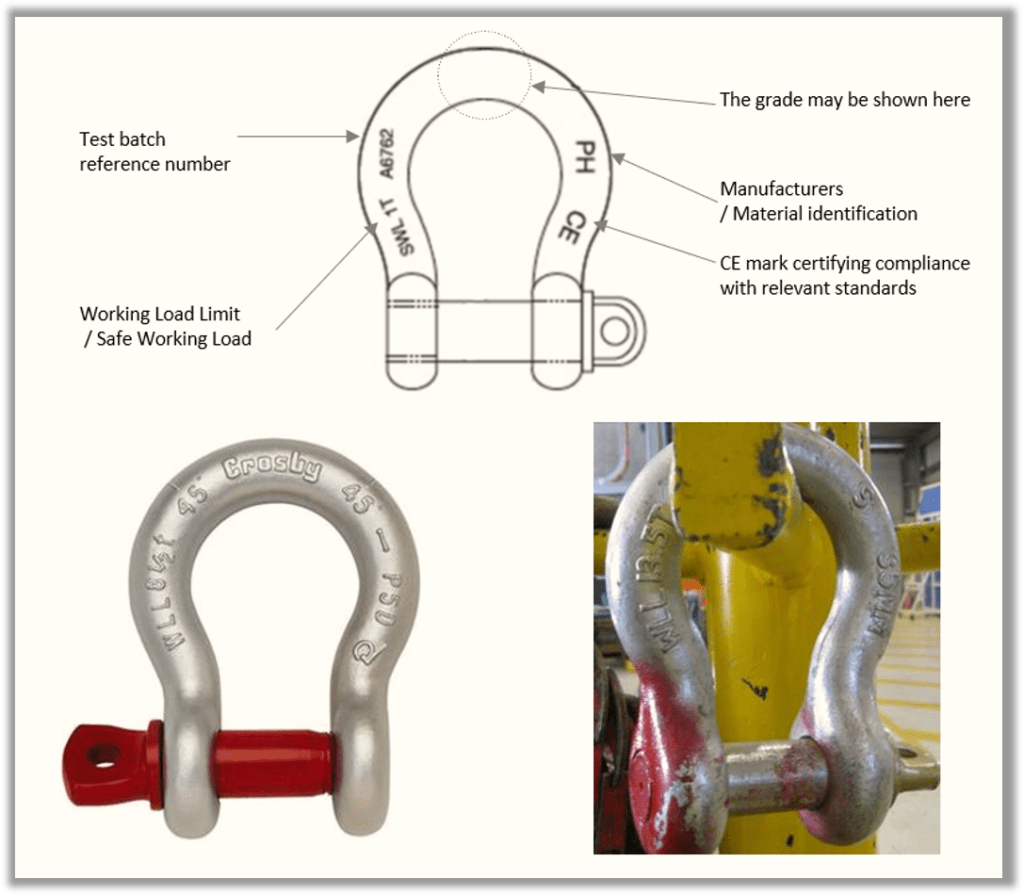
Figure 10: Typical manufacturer’s markings on shackles
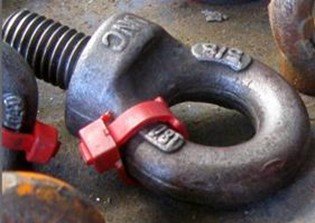
Figure 11: Typical manufacturer’s markings on eyebolts
Shackles and eyebolts are usually marked by the forging die so it is impractical to provide a unique ID by that method. When sold, the item can legitimately be related to its documentation by the batch ID alone. However, once in service the batch ID alone is not adequate because the batch ID is not unique.
One solution is to add a suffix to the batch ID (although other numbering maybe used) by hard stamping, which can be done much more efficiently under workshop conditions. It may be possible to request that suppliers add these additional markings. Test certificates must be issued with the full ID number when supplying the equipment and not annotated after as this invalidates the certificate.
Also Read:Near-Miss: Shackle Configuration
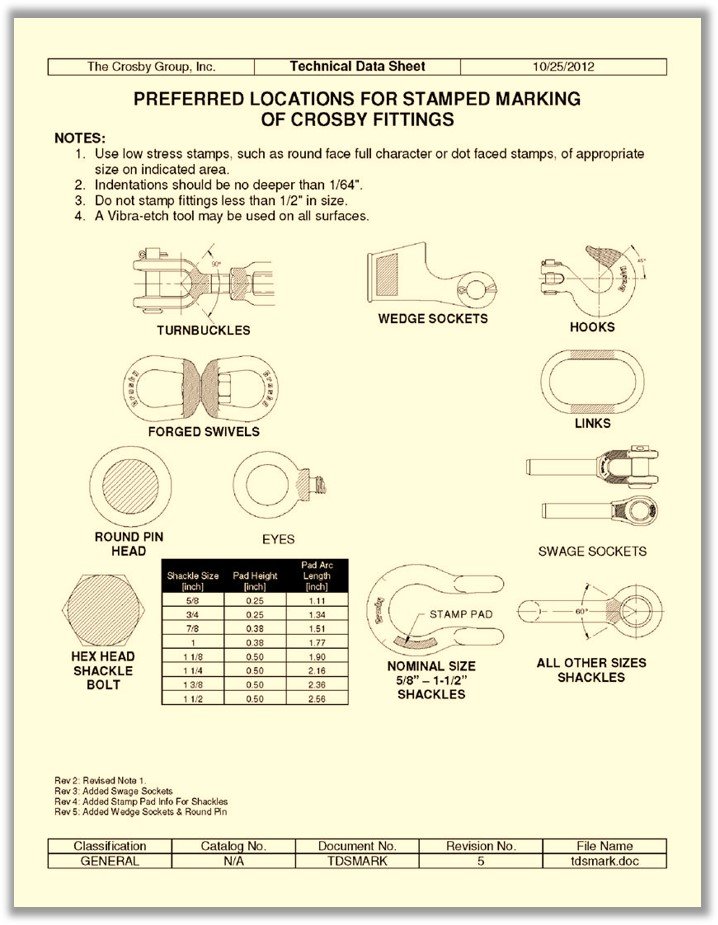
4.1- Hard Stamping
Hard stamping displaces material and if too large or too deep will create a local stress raiser. A common mistake is to use too large a stamp. A flat stamp on circular section material will have to indent deeper in the center compared to the top and bottom. Often the result is an incomplete character. The bigger the stamp relative to the material diameter, the worse this gets. Attempts to deepen the marking by repeated strikes only make a mess and do more damage. A smaller stamp does less damage and is actually easier to do and read. It also minimizes the length of the marking. Hard stamping should be restricted to low-stress areas such as the straight sides of a shackle and kept away from high-stress areas such as the crown.
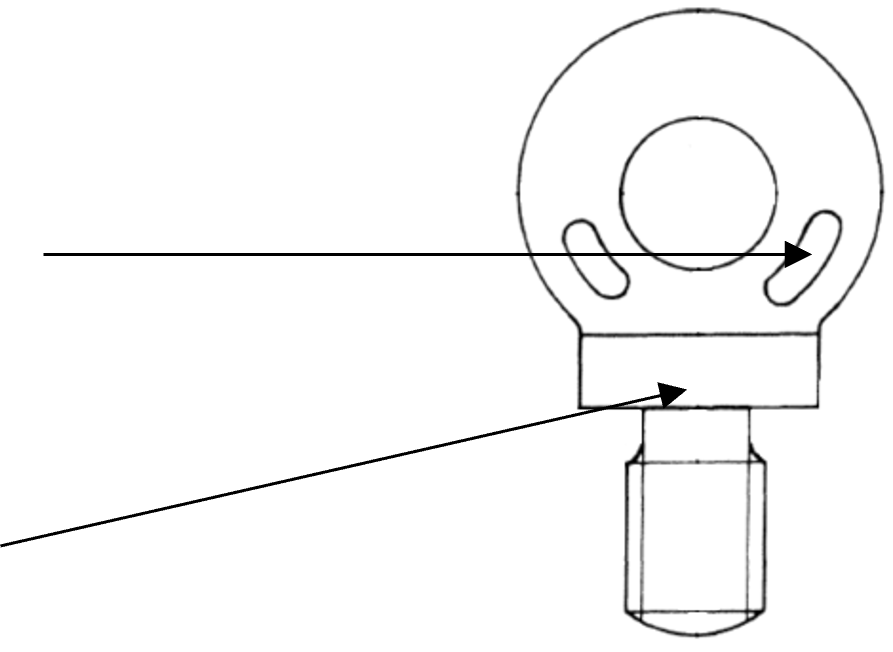
If more space is required, the outside of the collar can be used but the machined face on the underside of the collar must never be used. There has been much debate as to whether or not shackles and eyebolts can be hard stamped but research by the (UK) Lifting Equipment Engineers Association has confirmed that hard stamping up to 0.2mm in depth may be applied without detrimental effect on mechanical properties. Such precise stamping is hard to achieve so engraving/etching may be preferable
Two major manufacturers of lifting accessories are Crosby and Rud. Crosby is not averse to their accessories being hard stamped and provides the technical data sheet shown in Figure 12. The approach of Rud is that vibro-etching is the preferred option but stamping is permitted, providing that it is performed by a Competent Person who must only stamp the accessory in area designated by the manufacturer.
Also Read: Rigging and load calculation overview
4.2- Vibro-etching
Vibro-etching (also sometimes referred to as vibro-etching or dot peening), involves indenting a series of dots into materials to form alphanumeric identification, logos, and 2D Data Matrix codes. The advantage of this process over that of hard stamping is that the depth of indentation can be accurately controlled and the local stress caused by the deformation of the metal is much less. Figure 13 shows the results achieved, on a sample shackle provided by UK–based Pryor Marking Technology using a portable BenchDot 150-150EZA/3000 machine.
Note: Disregard the location of the etching on this sample
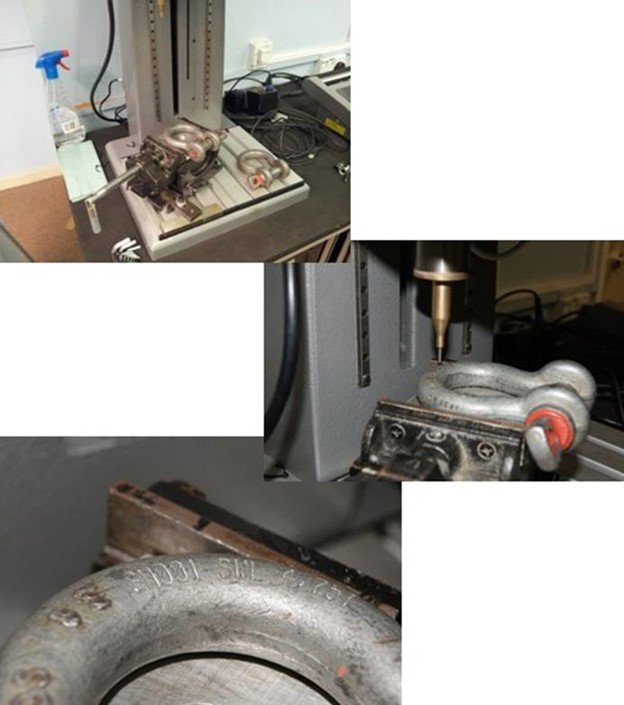
Figure 13: Vibro-etching
4.3- RFID Technology
One of the more advanced solutions on the market is Radio Frequency Identification (RFID) technology which is currently being used by Rud. In this system, each item has an RFID chip embedded into it, this allows the addition of extra information to a data sheet which can then be cross-referenced with the chip. When checking the product, the Competent Person will have the full history and data of the individual item.
This approach is included for completeness but it may not be cost-effective or practical for all applications.
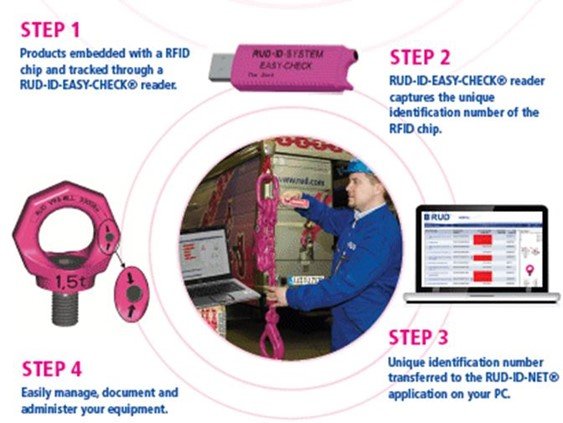
Fig 14: Extract from Rud RFID advertising literature
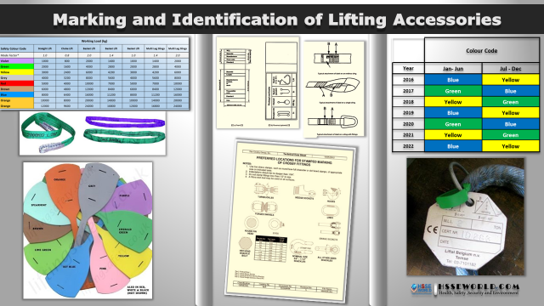
4.4- Colour Coding
Color codes are an add-on for visual identification only. They do not replace the requirement for a pre-use inspection and they are not intended to replace other means of identification e.g. Unique ID. There are various methods of applying a color code, some of which have already been illustrated in earlier sections of this document. Paint is often used for colour coding eyebolts, shackles, and wire rope slings. However, over time layers of colour build up, and as the paint wears during use it can become difficult to decide which is the latest. Successive layers of paint may also fill in any hard stamping or result in forged markings becoming illegible.

Fig15: Red color-coded shackles

Fig 16: Painted Lifting Accessories Accessories
Read: Control and safe use of lifting Equipment and accessories
Care must also be taken when using paint colour coding in conjunction with fully painted accessories. There may be a conflict with the colours and when the paint wears / flakes off, reading the markings can become difficult.
Coloured cable ties are quick and easy to apply and are usually durable enough. However, remember that many people have some degree of colour blindness, particularly males. Red-green colour blindness is one of the most common and so the choice of a green tag on a red eyebolt (Fig 17) may not be the best choice. Therefore consider testing for this condition and if necessary, provide an alternative method of indicating the inspection status.

When designing a colour system there needs to be sufficient colours to provide a long enough time cycle. Some lifting accessories may not be found when due for inspection (which should be recorded in the lifting accessories register). A good control and issue system should minimize this but the possibility should be accommodated. Therefore the time cycle must avoid repeating a colour before there is a reasonable chance of all items being accounted for. A minimum time cycle of two periods is recommended – see figure 18 for a typical colour coding scheme. Readily visible signs at strategic positions around the site should show the current colour code. Employees must also be aware of the current colour code – a common failing during EHS assessments!
Sequentially numbered cable-ties could be used to address both the issues of unique identification and inspection status (see Fig 19)
Consider also whether Customers or contractors working on the same site may also be using colour coded lifting equipment. It may be necessary to identify ownership of the item in some way, as well as the inspection status.

Fig 18: Model colour coding scheme
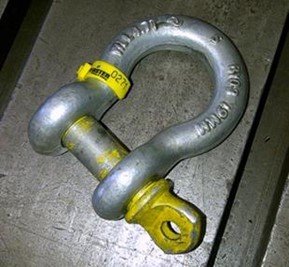
Fig 19:Sequentially numbered colour-coded cable-tie
Also Read: Is Periodic Mobile Proof Testing Required for Lifting Slings?
Visit Safetybagresources for many resources downloads
Key Takeaways
- Lifting Accessories require unique IDs for traceability and compliance with safety standards.
- Manufacturers must mark key information, including Working Load Limit (WLL) and batch numbers, for safety and regulation.
- Various identification methods exist, such as tags, color coding, and RFID technology, to ensure equipment safety and traceability.
- Hard stamping and vibro-etching provide durable ID methods, while tags and cable ties offer flexibility for inspections.
- It is essential to choose appropriate marking methods based on the item and its working environment to minimize hazards.


