How to Calculating Fall Arrest Distance with 4 steps
4 min readWhether you are working in a cradle, on scaffolding, or performing any other type of work at heights, the fall arrest system is of no help if you reach the ground before your fall is stopped. Although it sounds obvious, we, unfortunately, see all too often inadequate fall arrest systems. The source of the problem is usually a lack of training or a solution developed without the assistance of a qualified person. Miscalculating the fall arrest distance always leads to the same result: injuries or death.
Also Read: Photo of the day: choosing the right Anchorage

Many workers don’t fully understand how a fall arrest system works and don’t adjust the system according to the actual data of the situation. Often, when adding the length of the safety harness, the lanyard, the anchorage as well as the height of the worker, the total length can cause injuries. Therefore, to learn how to efficiently calculate the fall distance and leave the necessary clearance is crucial.
Also Read: Fall Arrest Systems:can workers tie off at foot level?
The Components of a Fall Arrest System
A fall arrest system (personal protective equipment for working at heights) is essentially composed of three integral elements: a body harness, a fall-arrest device (lifeline, shock absorber, carabiner, connector, cable, etc.), and an anchorage system.
The greater the free fall distance, the more energy the fall will produce and the more violent will be the shock. The free fall is the distance traveled during a fall before the fall arrest system is triggered. It is important to minimize the free fall distance (maximum of 1.8 meters according to the CSTC). In order to achieve this, the user must whenever possible, attach his lanyard to an anchorage connection point just above his shoulders. In case of a fall, this will reduce the impact force, the risks of contact with an obstacle, and the injury severity while facilitating emergency and rescue operations.
Specific anchorage points should be located directly above the user – “above” in order to reduce the fall distance and “directly” to minimize the pendular movements. The risk of swing fall increases in direct relation to the horizontal distance between the user’s harness and his anchorage connection point. For that reason, anchors (on the roof) must not be spaced more than 3 meters (10 feet) in between on a right angle from the building’s facade and applied along with with with the traction axis corresponding to the worker’s potential fall. Also, the angle created by the offset must not be over 22 degrees.
Four Factors to Be Taken into Consideration When Calculating the Fall Arrest Distance
1. Length of the lanyard, the harness, and the anchorage connector
For an untrained worker, a lanyard of six feet may seem enough when working at a height of 10 or 12 feet. Still, the length of the harness and the anchorage connectors must be added. A fixed anchor is easy to calculate as the only distance to add is the ring. However, when the anchor is part of a horizontal lifeline, the calculation is more complex. Horizontal lifelines are not tight in their initial design and can stretch in the event of a fall. This collapse must be taken into account. Calculating the collapse may be as simple as tightening the rope to calculate the distance, but determining the collapse during a fall is more complicated. The force applied on a lifeline will pull it farther than you could measure when only tightening the line. On average, calculate about 3% of the total length of the tight line to 15% of the length of a lifeline using a shock absorber. Ideally, an engineer should calculate the collapse for a fall according to the number of people attached to the lifeline.
( Find out: How to choose your fall protection anchorage).
2. Deceleration distance
We often forget the deceleration device. When deployed, it adds 3.5 feet more to the length of the lanyard. Also, the harness can stretch so the anchorage point is moved higher than the head during a fall. In this example, the distance to be considered is not 6 feet, but 10.5 feet.
3. Height of the worker
Although apparently simple, this information is often overlooked when calculating the fall arrest distance. It is imperative to take the height of the worker under the anchorage point into account. A fall arrest system that stops a worker at 12 feet is not efficient when the lowest level is 14 feet, unless the worker is less than 2 feet tall, which is highly unlikely! On average, at least 5 feet must be added to the calculation to take into account the person’s height.
(Find out: How to inspect your fall harness when working-alone)
4. The safety factor
Section 8 of the CSA Z259.16-04 standard: Design of Active Fall-Protection Systems, offers the necessary guidelines to evaluate the required clearance underneath the worker using a fall protection anchorage system. In most cases, the required minimum clearance for using a harness as a fall prevention device must be greater than 4.5 meters (15 feet).
Calculation of the required fall arrest distance (measured from a rigid anchorage point)
Step 1:
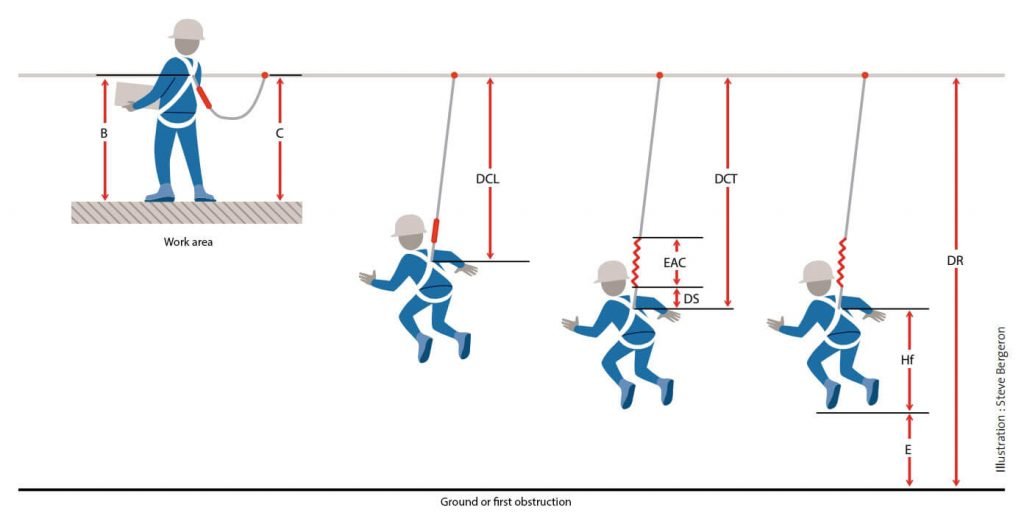
Calculate the free fall distance Free fall distance = Length of the lanyard + Height of back D-ring – Height of the anchor
Step 2:
Calculate the total fall distance Total fall distance = free fall distance + deceleration distance (shock absorber) + D-ring slide
Step 3:
Calculate the minimal required fall clearance Minimal required fall clearance = total fall distance + safety distance factor + height of suspended worker (between the feet and D-ring)
Step 4:
Add the safety factor before the nearest obstruction.

(Find out: What happens if I Tie off at the foot level with a personal SRL ).
For Many Resources please Visit Safetybagresources


