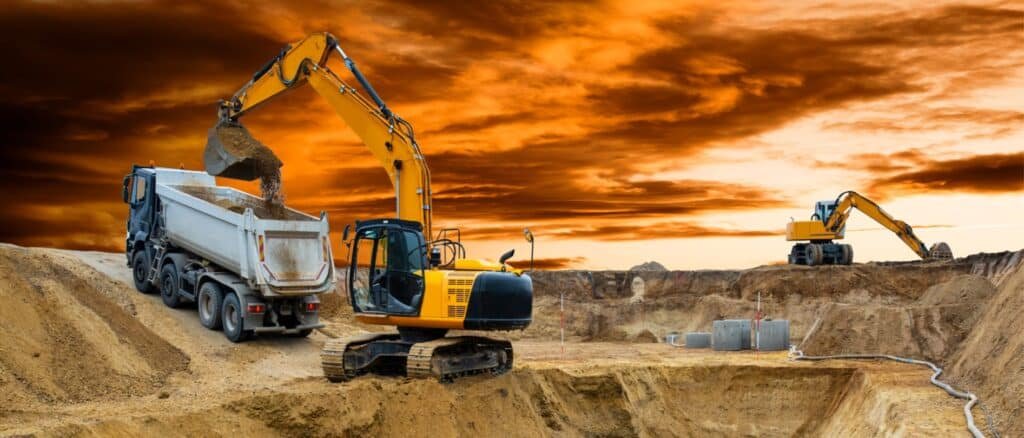
Excavation and trenching are among the most hazardous operations in construction. New types of excavation equipment and strict enforcement of the Occupational Safety and Health Administration’s (OSHA) standards have made excavation and trenching safety and its operations safer. Yet, many workers continue to die each year and many more are seriously injured in cave-ins and other excavation and trenching accidents. This article highlights the key elements of the OSHA excavation standards found in 29 Code of Federal Regulations (CFR) 1926, Subpart P, and describes safe work practices that can protect workers and make a dangerous job safer including the following:
- EXCAVATION AND TRENCHING HAZARDS
- SOIL MECHANICS
- PROTECTIVE SYSTEMS
- TRAINING
Also Read: Safety Requirements during Concrete Operations

Excavation and Trenching Hazards
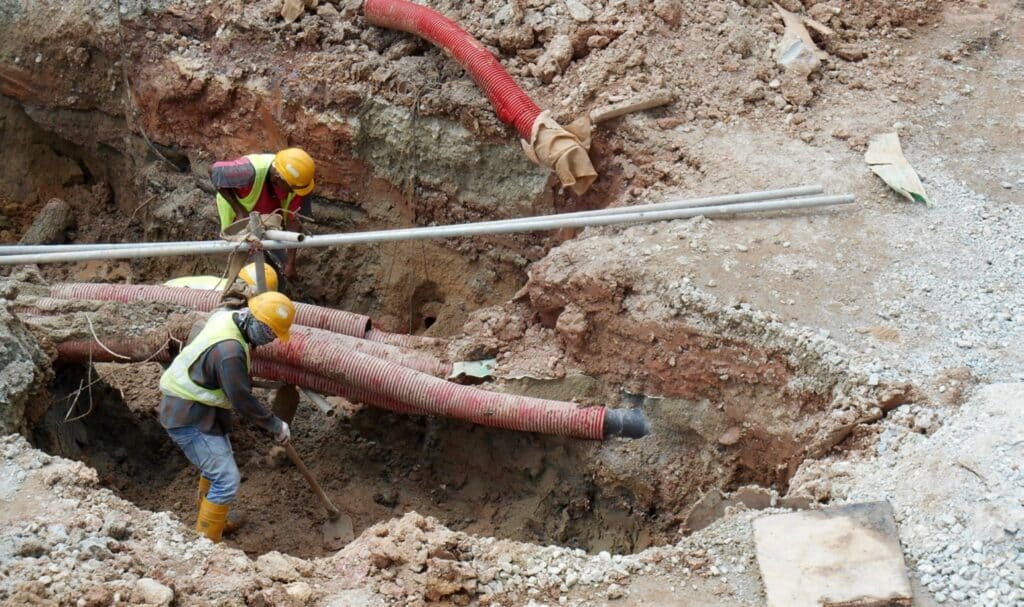
Serious hazards exist for all employees who work in trenching and excavation. Cave-ins pose the greatest risk and are more likely than some other excavation-related incidents to result in death. One cubic yard of soil can weigh nearly 3,000 pounds as much as a car.1 An unprotected trench can crush, bury, or suffocate workers before rescue can occur. Employers must ensure that workers enter trenches only after proper protections are in place to prevent cave-ins and other hazards caused by falling loads, hazardous atmospheres, and mobile equipment struck-by accidents.
Preplanning
A basic rule for excavation is, “Plan your dig, then dig your plan.” No matter how many trenching, shoring, and backfilling jobs an employer has done in the past, care and preparation must be taken with each new job. If you encounter something unplanned, stop and replan. Before digging, try to know everything possible about the excavation area.
Map and survey the route. Many on-the-job incidents result from poor initial planning. Also, waiting until after the work starts to correct mistakes in shoring or sloping slows down the operation, adds to the cost of the project, and makes cave-ins or other excavation failures more likely.
Although not required by OSHA, soil boring is good engineering practice. It is a used to investigate and examine soil composition and conditions along the route where trenching or excavation will occur.
Before bidding on a job always consider all the materials you will need to perform the work safely following OSHA standards including:
- traffic;
- location and physical condition of nearby structures;
- soil classification;
- surface and groundwater;
- location of the water table;
- overhead and underground utilities;
- weather;
- quantity of shoring or protective systems that may be required;
- fall protection needs;
- number of ladders that may be needed; and
- all other equipment.
Also Read: Photo of the day: Trenching Safety Tips That Can Save a Life
OSHA Requirements
The following OSHA “specific excavation requirements” are found in 29 CFR 1926.651:
- Remove surface encumbrances. Trees, signs, sidewalks, power poles, parking lots, and walls must be removed, braced, shored, or otherwise supported to prevent a hazard.
- Identify underground utilities. Sewer, water, gas, communications, and electric utility lines must be identified and physically located. Call the local area utility locator company and provide the location or the route and depth of the proposed excavation. Usually, the locator company requires a minimum of 48 hours advance notice. When utilities are located, physically and cautiously expose the utility. Once the utility is uncovered, it becomes your responsibility to support, protect, or remove it as needed. Locating all buried utilities that cross or parallel your route may be time-consuming, but failure to do so could have serious consequences. Digging into a petroleum gas line or buried electrical utility could be fatal.
- Ensure a safe entry and exit. Any trench or excavation 4 feet or deeper must have a means of entry (ingress) and exit (egress). Locate ladders or ramps no more than 25 feet from any employee who is in the excavation. Also, extend ladders 3 feet above the surface of the excavation and tie the ladders off if possible.
- Protect workers from vehicular traffic. Workers exposed to vehicular traffic must wear “high visibility” vests or clothing.
- Protect workers from falling loads. Never allow workers under loads handled by lifting or digging equipment. Keep workers away from equipment being loaded and unloaded and require operators to stay in their vehicles provided they are protected by a cab constructed per
- 29 CFR 1926.601(b)(6).
- Provide warning systems on mobile equipment. All mobile equipment such as front-end loaders, bulldozers, and dump trucks must be equipped with a warning device such as a backup alarm if the operator does not have a clear and direct view of the edge of the excavation. The use of hand signals from a flag person, stop logs, barricades, or other mechanical signals are also safe practices. An attentive operator and a flag person who knows and uses proper hand signals provide the safest method.
- Test for hazardous atmospheres. In excavations deeper than 4 feet with the potential for a hazardous atmosphere or oxygen deficiency, conduct air testing before workers enter the excavation and as often as necessary to ensure the atmosphere remains safe. Ventilation or respiratory protection may be needed to protect workers from harmful atmospheres.
- Protect against water hazards. Workers must not work in excavations where water is collected unless proper steps are taken to protect workers from the hazards. This may include using specific shoring; water removal to control the level of accumulating water; use of lifelines and harnesses; or careful monitoring by a competent person
- Ensure the stability of nearby structures. Excavation below the base or footing of a foundation, wall, sidewalk, pavement, or other structure is not permitted unless:
- shoring or bracing is provided to prevent cave-ins;
- excavation is in stable rock; or
- a registered professional engineer has determined the structure is far enough away that the excavation to not be affected or that the excavation will not pose a threat to the workers.
- Protect against loose rock and soil. Keep excavated earth (spoil), materials, tools, and equipment at least 2 feet from the edge of the excavation. Rock and soil should be scaled off the face of the excavation or retained by shoring or other acceptable methods to prevent the material from falling and striking workers. Never allow employees to work on the sides of the slope or benched excavation above other workers unless the lower workers are protected from falling materials. If possible, grade the slope away from the excavation. This serves a dual purpose of keeping equipment and vehicles from accidentally rolling into the excavation and directing rainwater away from the excavation,
- Wear personal protective equipment (PPE). OSHA 29 CFR 1926.100(a) requires the use of hard hats where there is a possible danger of a head injury from falling objects. Excavation operations expose workers to these hazards in every work zone during excavation.
- Inspect the site before work begins. A competent person must inspect the excavation and its support system for signs of possible cave-ins, protective system failures, hazardous atmospheres, or other dangerous conditions. Inspections should occur before the start of work, as often as needed throughout the workday, and after every rainstorm or other hazard-increasing occurrence. When an inspection finds evidence of a situation that could result in a hazard to the worker, exposed workers must be removed from the hazardous area until the needed steps have been taken to ensure their safety.
- Provide fall protection. Where personnel or equipment must cross an excavation, a walkway or bridge must be engineered to withstand the maximum expected load. The walkway or bridge must have standard guardrails that meet OSHA standards outlined in 29 CFR 1926 Subpart M. All unattended excavations or those in remote locations must have adequate barriers or physical protection to prevent people from falling into the excavation. When completed, always backfill trenches, wells, pits, or shafts as soon as practical.
Also Read: Hydro Excavation
Soil Mechanics

Horizontal and vertical forces within the earth keep undisturbed soil in place. An excavation disturbs or removes these forces. Soil naturally moves downward and inward due to a variety of factors, such as soil type, moisture, vibration, and surface loading.
Knowing the properties and behavior of soil – referred to as soil mechanics — is vital to properly slope and shore an excavation or trench. Safety depends on proper soil classification and soil identification tests.
Soil Classification
The type of soil determines the stability of the excavation. OSHA requires that a competent person classifies the soil and installs the needed protective equipment before workers enter the excavation OSHA identifies four soil classifications: types A, B, C, and stable rock.
- Type A soil
This is the most stable soil. It is composed of clay, silty clay, clay loam, and sandy clay. It has an unconfined compressive strength of 1.5 tons per square foot (t/sf) or greater.
Type A soil is very cohesive. Unfortunately, people too often wrongly assume it is stable and will not collapse if not shored. No matter the composition or apparent stability, soil cannot be classified as Type A soil if:
- the soil is fissured;
- subject to vibration from traffic, equipment, or other excavation activities;
- has layers that dip into the excavation on a slope of 4 feet horizontal to 1 foot vertical or greater; or
- other factors, such as seeping water, make the soil less than stable.
- Type B soil
This is a cohesive soil composed of silt, silty loam, sandy loam, and granular cohesive solids including crushed rock (angular gravel). It has an unconfined compressive strength greater than 0.5 t/sf but less than 1.5 t/sf.
- Type C soil
This is the least stable soil. It is a non-cohesive soil composed of granular material such as sand, gravel, loamy sand, submerged soil or rock, or soil where water is draining. Type C soil also includes soil in a sloped system where the layers dip into the excavation at 4 feet horizontal to 1 foot vertical or greater. Type C soil has an unconfined compressive strength of 0.5 t/sf or less.
- Stable rock
This natural solid mineral material can be excavated with vertical sides and remains intact while exposed.
Soil Testing

The competent person conducts both visual and manual soil tests when making site soil classifications. Factors to examine include:
- Soil particle size
Usually, there is a mixture of soil particle sizes. The percentage of sand to silt and clay determines the soil type.
- Grain size
If a grain of soil is larger than a #2 pencil lead, it is classified as gravel. If it is smaller, but can be seen by the unaided eye, it is classified as sand. Clay and silt particles cannot be seen without the use of a microscope. A general statement is the larger the grain size the less stable the soil.
- Dry Strength
- If the soil is dry and crumbles on its own or with moderate pressure into individual grains or fine powder, it is granular (any combination of gravel, sand, or silt).
- If the soil is dry and falls into clumps that break into smaller clumps, that can only be broken with difficulty, it may be clay in any combination with gravel, sand, or silt.
- Soil is considered unfissured if the dry soil has no visual signs of cracks and breaks into large clumps only with difficulty.

- Cohesiveness
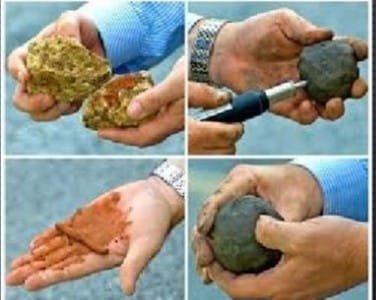
- Plasticity test (or thread test) This test determines whether a soil sample is cohesive. To perform the test, roll a sample of the soil between the palms of your hands into a thread about one-eighth-inch diameter and at least several inches long. Then, place the rolled soil thread on a flat surface and pick it up by one end. If the sample holds together for two inches without breaking, it is considered cohesive.
- Ribbon test This is another test for cohesiveness that is used as a backup test for the thread test. Roll a representative soil sample into a cylinder about three-fourths-inch in diameter and several inches long. Then, squeeze the sample between your thumb and forefinger into a flat unbroken ribbon one-fourth to one-eighth-inch thick, allowing it to fall freely over the fingers. If the ribbon does not break before several inches are squeezed, the soil is considered cohesive.
- Thumb Penetration Test The thumb penetration test estimates the unconfined compressive strength of cohesive soils. It is based
- on testing described in the American Society for Testing and Materials (ASTM) standard D2488. To perform the test, take a soil clump collected from a freshly dug spoil pile. Press your thumb against the sample.
- Type A soil easily indents with your thumb, but penetration requires great effort.
- Type B soil can be penetrated with moderate difficulty when using the base of your thumbnail.
- Type C soil can be molded by light finger pressure and easily penetrated several inches by the thumb.
- Penetrometer Test Mechanical devices such as a pocket penetrometer and hand-operated vane shear penetrometer can help determine soil types. Use the manufacturer’s instructions for device operation and interpretation of the results.
- Other factors to consider
- Soil that clumps and holds together when dug out is most likely clay or silt.
- Cracks in the walls of the excavation with material spilling off (slabs of soil falling off the sides) indicate type B or C soil.
- Standing water or water seeping out of the bottom of trench walls automatically classifies the soil as type C.
- Layered soil adjacent to roadways or buildings, disturbed soil, or soil exposed to a source of vibration requires a registered professional engineer to classify the soil.
- Protective system requirements are based on the results
- of testing. Never enter an unprotected excavation to obtain a soil sample. Take the soil sample from freshly dug material in the spoil pile. Test as soon as possible to preserve the sample’s natural moisture.
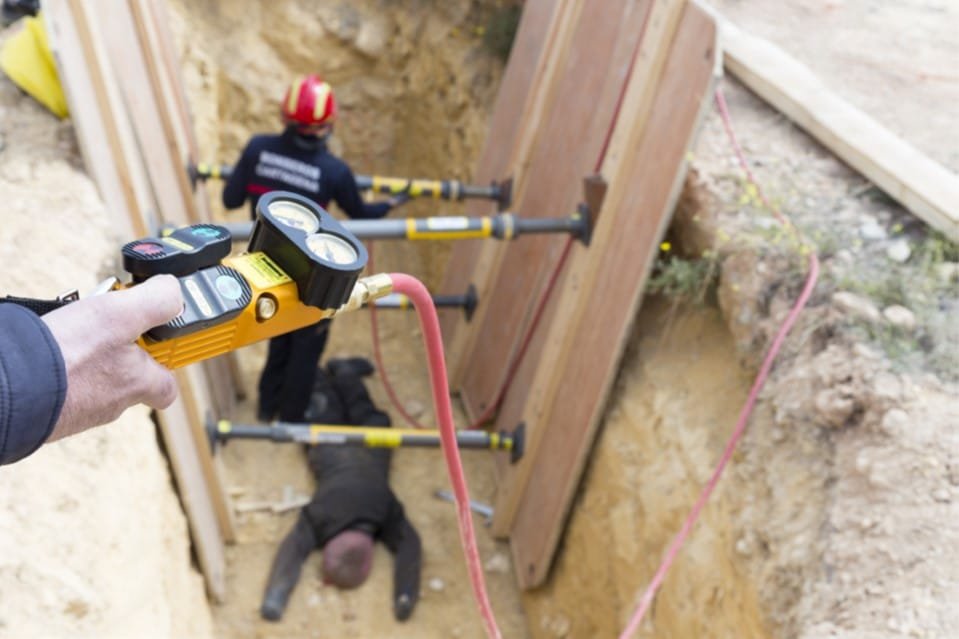
Protective Systems

“Slope It. Shore It. Shield It.”
Employees can prevent cave-ins by:
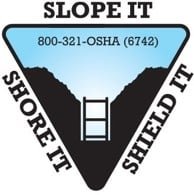
- SLOPING and benching the sides of the excavation;
- SHORING trench walls with supports:
and
- SHIELDING trench walls with trench boxes.
OSHA states, “Each employee in an excavation shall be protected from cave-ins by an adequate protective system.” There are only two exceptions when a protective system is not required:
- The excavation is made entirely in stable rock.
- The excavation is less than 5 feet deep and has been examined by a competent person who determined there is no indication of a potential cave-in. In many cases, the type of protective system needed is well-known and simple to use.
At other times employers will undertake the more complex process of designing a protective system. Designing a protective system is based on soil classification, depth of cut, the water content of the soil, weather and climate, and other operations in the area. Employers are free to choose the most practical design that provides the necessary protections. However, any system used must meet the required performance criteria and be governed by space, soil type, depth, speed, and expense. The following are the primary protective systems.
Sloping and Benching

Sloping is a protective measure that cuts the walls of the excavation back at an angle from the floor to produce a stable slope. The slope angle is based on soil type. The flatter the angle of the slope, the greater the protection factor for the employee.
- Type A soil:
The ratio is 3/4 ft. horizontal for each foot vertical (53° from the horizontal).
- Type B soil:
The ratio is 1 ft. horizontal for each foot vertical (45° from the horizontal).
- Type C soil:
The ratio is 1 1/2 ft. horizontal for each one foot vertical (34° from the horizontal).

Benching is the process of cutting benches or steps into the excavation. The angle used for benching is based on a ratio of horizontal to vertical cuts. It should be noted that benching is reserved only for cohesive soils. It is not permissible to bench Type C soil because of its inability to support a vertical wall. Type C soils always require the use of sloping, shielding, or shoring.
These factors make the soil less stable:
- vibration from machinery or traffic;
- exposure to rain or flooding;
- periods of low humidity (drying); and
- soil loading from overburden or equipment.
The following signs of distress indicate an imminent cave-in danger:
- cracks in excavation walls;
- cracks in the surface soil starting half to three-quarters the distance of the depth of the excavation;
- a bulging trench wall; and
- clods or small sections sloughing off from the trench wall.
If any of the above signs are observed, evacuate employees immediately and reinspect the excavation. Either cut the slope back further or install a mechanical protective system.
Shoring and Shielding
Shoring and shield systems are protective measures that add support to an excavation. Shoring and shielding should not be confused. Shoring is designed to prevent collapse, while shielding is designed to protect workers should a collapse occur. The safest system is one that can be installed and removed without personnel entering the excavation.
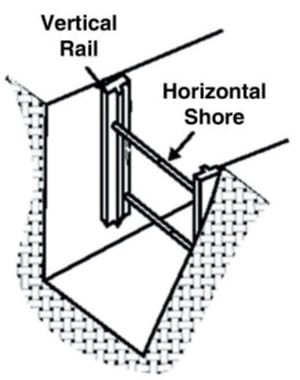
Shoring is the process of bracing the walls of a trench to prevent collapse and cave-ins. Several methods can be used to shore up a trench. Hydraulic shoring is the use of hydraulic pistons that can pump outward until they press up against the trench walls. This is typically combined with a steel plate or special heavy plywood. Another method is called beam and plate (or beam and column), in which steel I-beams are driven into the ground and steel plates are slid among them. A similar method that uses wood planks is called timber shoring (or soldier boarding). Hydraulics tend to be faster and easier; the other methods tend to be used for longer-term applications or larger excavations.
Trench shields (or trench boxes) are engineered metal boxes that are placed in the excavation. A shield does not provide structural strength to the excavation but provides workers with a safe worksite that protects them from collapsing material. A registered professional engineer must design the trench shield system, which can be premanufactured or built onsite as necessary. Regardless of where they are built, they must be constructed to exact engineering specifications. There are several safety requirements when using a trench shield:
- Install shields in a manner that restricts side-to-side or other hazardous movements in the event of sudden lateral shifting (trench failure).
- Do not expose the shield system to loads exceeding the design standard.
- Protect workers from cave-in hazards when entering or leaving the shield-protected area.
- Do not allow workers inside the shield or to ride on the shield when the shield is being installed, removed, or moved vertically.
- Extend the shield structure a minimum of 18 inches above the lip of the excavation when used in conjunction with a sloped or benched excavation.
- Excavation is allowed up to 2 feet below the bottom of the shield if the shield system is designed and calculated to resist the trench’s full-depth forces. However, there must be no indication of a possible soil collapse from behind or below the bottom of the shield.
Installing and Removing Protective Systems
The OSHA Excavation Standards require employers to take certain other steps to protect workers when installing and removing support systems. For example:
- Members of support systems must be securely connected to prevent sliding, falling, kick outs, or predictable failure.
- Support systems must be installed and removed in a manner that protects workers from cave-ins and structural collapses and from being struck by members of the support system.
- Members of support systems must not be overloaded.
- Before the temporary removal of individual members, additional precautions are required, such as installing other structural members to carry loads imposed on the support system.
- Removal must begin at, and progress from, the bottom of the excavation.
- Backfilling must progress together with the removal of support systems from excavations.
Also Read: Major Safety Concerns for Construction Workers
Training
Workers’ have the right to receive information and training in a language and vocabulary the worker understands about:
- workplace hazards;
- methods to prevent the hazards; and
- OSHA standards apply to their workplace.
Employers are required to train employees on ways to perform their job safely. OSHA also encourages companies to keep a record of all safety and health training they perform. Training documentation can also supply an answer to one of the first questions an investigator will ask following an accident: “Did the employee receive adequate training to do the job?”