Personal Fall Protection Equipment
11 min readThe Occupational Health and Safety Regulation requires workers to use a fall protection system where they could fall at least 3 m (10 ft.) or where a fall from a lesser height may result in serious injury. This booklet is an introduction to the proper use of personal fall protection equipment. Do not use this booklet as a substitute for the Occupational Health and Safety Regulation concerning fall protection, or for the manufacturer’s instructions specific to the equipment you are using. In addition, workers must be trained thoroughly in the safe use and limitations of personal fall protection equipment, including safety belts, harnesses, lanyards, and lifelines.
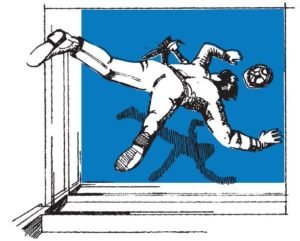
How long does it take to fall?
Many workers believe that they have time to regain their balance before they fall — this is not always true.The following table indicates how far you can fall in just a few seconds:
| Time (seconds) | Distance (meters) | Distance (feet) |
|---|---|---|
| 0.5 | 1.2 | 4 |
| 1 | 5 | 16 |
| 1.5 | 11 | 36 |
| 2 | 20 | 64 |
| 2.5 | 31 | 100 |
| 3 | 44 | 144 |
| 4 | 78 | 256 |
You may not have time to grab hold of something safe, but you can still prevent a tragedy. Properly maintained and worn, a safety belt or full body harness attached to a secure anchor could save your life.
Fall restraint or fall arrest?
Fall restraint systems prevent you from falling. Examples include:
- Work-positioning systems using either safety belts or full body harnesses that attach you to an anchor and leave both your hands free to work
- Travel-restriction systems of guardrails or personal fall protection equipment used to prevent you from travelling to an edge from where you may fall
Fall arrest systems protect you after you fall by stopping the fall before you hit the surface below.
Examples include:
- Full body harnesses connected by lanyards or lifelines to secure anchors
- Safety nets
In choosing a fall protection system, you should first consider installing guardrails or barriers.
They provide a high degree of protection once installed properly. However, installing guardrails or barriers at a work site is not always practical that is when you may need personal fall protection equipment.
Written fall protection plan
A written fall protection plan is required prior to using a personal fall protection system for work with a potential fall hazard of 7.5 m (25 ft.)
or more. The written plan should identify:
- Potential fall hazards on the job
- Types of fall protection systems to be used
- Instructions to workers on how to safely use the equipment, and
- Instructions on how to rescue a worker who has fallen and can’t initiate self-rescue
Safety belts
When to use a safety belt?
You must never wear a safety belt in a fall arrest situation. If you fall into a safety belt, you could still suffer severe back and abdominal injuries. Restrict the use of safety belts to fall restraint systems only. If there’s a chance you could fall, install guardrails or wear a full body harness in a properly configured personal fall protection system.
Inspecting your safety belt
Inspect your belt before each use. Check the buckle, the webbing, the D-rings, and the manufacturer’s label for additional user
information. If the belt is damaged or worn, do not wear it.
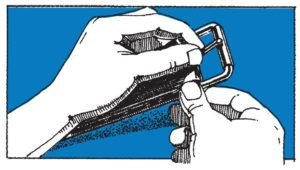
Buckle
Make sure the buckle’s tongue overlaps the buckle frame, moves freely, and is not bent or worn down. Check the roller to make sure it turns freely on the buckle frame.

Webbing
Look for frayed, cracked, cut, burned, or otherwise damaged webbing.

D-rings
Check to see whether D-rings are bent, cracked, nicked, or gouged. Do not use safety belts that show signs of damage.

Manufacturer’s label
Inspect the manufacturer’s label on the belt. The manufacturer’s label on an approved safety belt will contain the following information:
- Manufacturer or vendor identification
- Belt’s waist size
- Material the belt is made of
- Date the belt was manufactured
- Model number
- “Warning — not to be used for fall arresting”
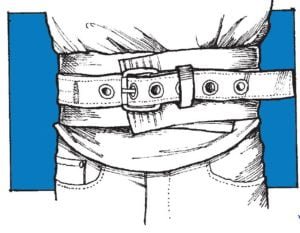
Putting on a safety belt
Before putting the belt on, make sure you have the right size.
Fasten the belt snugly around your waist. Wear it high on your waist, not low around the hips or pelvic area. Position the belt buckle at the front of your body, and make sure the belt tail is secure in the belt loop and not hanging out loosely.
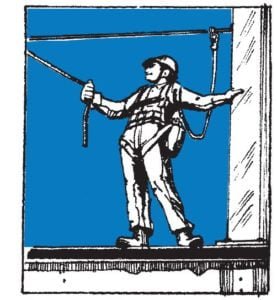
Full body harnesses
When to use a full body harness
When using personal fall protection equipment, wear a full body harness if you are at risk of falling. A full body harness consists of straps passed over the shoulders, across the chest, and around the legs. In a fall, a full body harness protects you more than a safety belt, because it distributes the force of impact over a greater area of your body.

Using the right full body harness
A full body harness designed to arrest falls should have
- A back-mounted D-ring located between the shoulder blades
- The letter “A” stenciled on each shoulder strap below the D-ring
- An arrow stenciled above each letter “A”pointing up at the D-ring
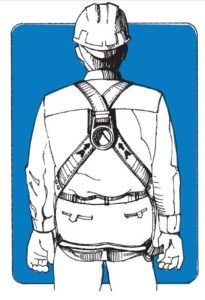
The arrows on the shoulder straps point to the only D-ring on the harness designed to safely arrest a fall. This is a full body harness worn to arrest falls.
Note that the D-ring is located between the shoulder blades.
Inspecting your full body harness
Inspect your harness before each use. Check the buckles, the webbing, the D-rings, and the manufacturer’s label for additional user
information. If the harness is damaged or worn, do not wear it.
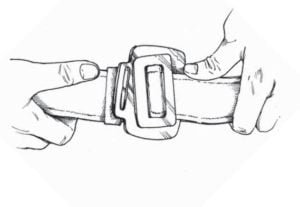
Buckles
Many full body harnesses have interlocking buckles called friction buckles. Look for bent, cracked, or nicked buckles. Test the buckles to
make sure the coupling is secure.
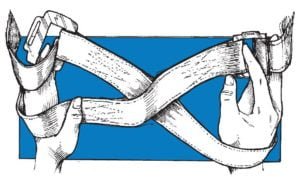
Webbing
Look for frayed, cracked, cut, burned, or damaged webbing, and loose or broken stitching.
D-rings
Look for bent, cracked, nicked, or gouged rings.
Manufacturer’s label
Inspect the manufacturer’s label on the harness. The manufacturer’s label on a the approved full body harness will contain the following information:
- Manufacturer or vendor identification
- Size of the harness
- Date the harness was manufactured
- Model number
Some harnesses are designed to serve more than one purpose. Check the manufacturer’s label for the harness’s classification.
Group A — Fall arresting
Group D — Controlled descent
Group E — Confined entry (raising and lowering)
Group L — Ladder climbing
Group P — Work positioning
Putting on a full body harness
Adjust all hardware and straps so the harness fits snugly, but still lets you move freely. Tuck in all loose straps so they don’t snag or cause you to trip.
Hook on to the harness D-ring (marked “A”) designed to arrest falls.
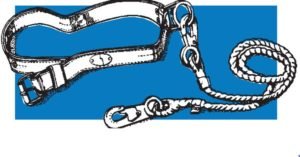
Lanyards and anchors
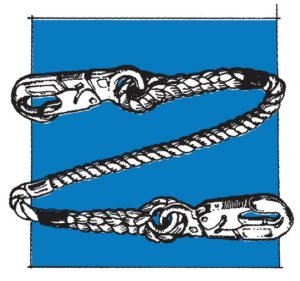
A lanyard is a flexible line of webbing or a synthetic or wire rope used to secure a safety belt or full body harness to a lifeline or anchor.
Using the right lanyard
A lanyard that meets the requirements of CSA Z259.1 is acceptable to HSSE world.
Keep lanyards as short as possible to reduce the distance you could fall. Try to arrange the lanyard
to limit a free fall to no more than 1.2 m (4 ft.) in a fall arrest situation.
When using a wire rope lanyard for fall arrest, a personal shock absorber must be incorporated as part of your personal fall protection system in order to keep the arrest force at a safe level.
Inspecting your lanyard
Inspect the lanyard before each use. Check the rope or webbing, the snap hooks, and the manufacturer’s label for additional user information.
Rope or webbing
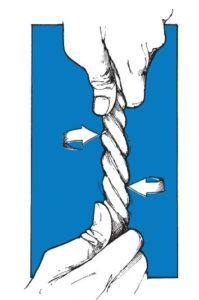
Inspect along the length of the lanyard and the eye splices. If you have a three-strand rope lanyard, carefully twist the rope open to look for worn, broken, or cut fibres. Do not overtwist, or you could permanently deform the rope.
Web lanyards should be discarded if the webbing has cuts or holes, is worn or frayed, or if the load-bearing stitches are damaged.If you find any signs of deterioration, burns, or broken or damaged strands, or if you have any reason to suspect the lanyard, do not use it.
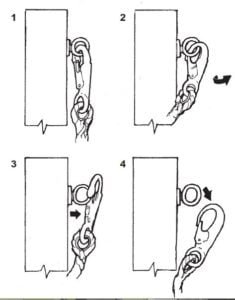
Snap hooks
CSA Standard Z259.1 requires snap hooks to be self-locking to prevent accidental roll-out. Roll-out can occur when small D-rings, or other
attachment hardware, cause the snap-hook gate to push open in a twisting action thus separating the two components.
Manufacturer’s label
The manufacturer’s label on a the approved lanyard will contain the following information:
- Manufacturer or vendor identification
- Length and diameter (if applicable) of the lanyard
- Material the lanyard is made of
- Date the lanyard was manufactured
- Model number
- “Warning any unit which has seen fall arrest service should not be used after such service”
Personal shock absorbers
A shock absorber slows and cushions the fall, reducing the force of stopping the fall.
Personal shock absorbers are often made of “tear webbing.” In a fall, specific stitch patterns in the webbing absorb the force of impact and progressively tear apart.
Warning: The shock absorber may increase the length of the lanyard by as much as 1.2 m (4 ft.) during a fall. Refer to the label on the
shock-absorbing unit to determine the maximum elongation. Allow for this extra fall distance when you include a shock absorber in your personal fall protection system.
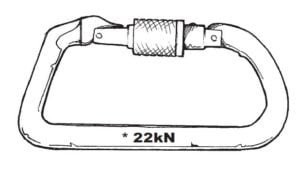
Carabiners
A carabiner is an oblong-shaped connecting device used to attach different components of a personal fall protection system.
A carabiner should:
- Have gates that are both self-closing and self-locking
- Have a breaking strength of at least 22 kN (5,000 lb.)
- Have the manufacturer’s identity and load capacity clearly marked on it
Inspect your carabiner before each use. Make sure it is free of damage, deformities, or excessive wear.
Anchors
An anchor — what you connect your lanyard or lifeline to — is a key element of any personal fall protection system. An anchor may consist
of a load-rated strap or sling wrapped around a substantial structural member on a building.
An anchor may also be a manufactured component that permanently or temporarily attaches to a structure.
Selecting an anchor
The selection of a suitable anchor depends on whether you want to restrain or arrest a fall.
If you want to prevent or restrain yourself from falling, your anchor must be capable of supporting at least 3.5 kN (800 lb.) or, alternatively, the equivalent of four times the weight of the worker.
If you want to arrest a fall, your anchor must be capable of supporting at least 22 kN (5,000 lb.). Alternatively, when the potential arrest forces are known, an anchor that is capable of supporting the equivalent of two times the maximum arrest force generated by a falling worker is acceptable. For example, the manufacturer will specify the maximum arrest force on personal energy absorbing devices in the fall arrest system.
Note: The anchor values above do not apply to horizontal lifeline systems, as the potential forces imposed on the anchors of a horizontal
lifeline can be much greater than those for personal fall restraint and arrest systems. go for information on acceptable horizontal lifeline systems.
Lifelines
A lifeline is a length of synthetic fibre or steel wire rope attached to an independent point of anchorage. A lifeline is typically used in conjunction with a fall arrest device, such as a rope grab.

Vertical Lifelines
Using the right vertical lifeline
The rope used as a vertical lifeline in a personal fall arrest system requires a minimum breaking strength of 26.7 kN (6,000 lb.). The reason for a breaking strength greater than that of the anchor is to allow for eye splices and knots tied in the rope at the anchor end. Splices and knots will weaken a rope; so, additional capacity of the lifeline is required.
The following is good industry practice for the safe use of a vertical lifeline:
- No knots or splices in the lifeline except at the termination points
- Attach each lifeline to an independent point of anchorage
- Only one worker connected to a vertical lifeline
- The lifeline should extend to within 1.2 m (4 ft.) of the ground or safe lower landing, and
- If the suspended length of a lifeline exceeds
91 m (300 ft.), lanyard length, and the effects of wind, rope construction, and strength must be taken into account
Inspecting a vertical lifeline
Exposure to sunlight causes most synthetic fibre ropes to deteriorate over time. Before each use, carefully inspect your lifeline to make sure it is in good condition. Look for signs of chafing or abrasion, cuts in the yarns or strands, or any visible deformities that would weaken the rope or interfere with the free movement of the rope grab.
If you have any doubts about the condition of the lifeline, do not use it.
Rope grabs
A rope grab is a device that travels along a lifeline and will lock onto it in the event of a fall. Rope used with all rope grabs must be the diameter specified by the manufacturer. Ensure the rope grab is installed on the rope in the correct orientation so the top of the device is installed pointing toward the anchor.
The two most commons types of mechanical rope grabs are automatic and manual.

An automatic (or mobile) rope grab moves freely along the lifeline with you. If you fall, it locks automatically and stops you after a short distance. If you are using an automatic rope grab, it is recommended that you limit your lanyard to 0.6 m (2 ft.) in length. An automatic rope grab meeting the requirements of Standard Z259.2.1 is acceptable to
HSSE Wrold.
A manual rope grab does not move freely with you. It is always in a locked position on the lifeline and must be re-positioned by hand.
Manual rope grabs are best suited for use in fall restraint systems.
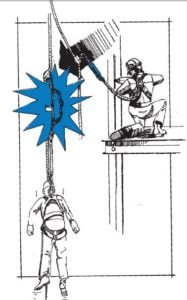
Swing-fall hazard
Be careful not to tie off to an anchor in such a way that if you fall, you’ll swing into an obstruction. This is called a swing-fall hazard. A swing fall can be as harmful as falling to the ground.

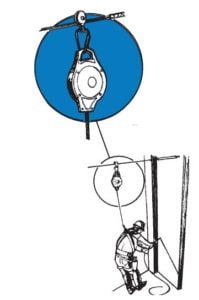
Retractable lifelines
A retractable lifeline is a specific type of vertical lifeline that works somewhat like the seat-belt of a car. The lifeline is coiled inside a protective housing. As you move up or down, the lifeline extends or retracts. The line is under constant
tension and leaves no slack. The moment you fall, the lifeline locks and stops your fall after a short distance. Many retractable lifelines have fall indicators on their protective housings. Do not use the lifeline if the indicator shows that a fall has occurred. After a fall, the manufacturer or the manufacturer’s authorized agent must inspect the lifeline and approve it for continued use.
Always use a retractable lifeline block in the vertical position, unless specifically allowed for by the manufacturer.
Horizontal lifelines
A horizontal lifeline consists of a synthetic or wire rope, or fixed rail, rigged between two substantial anchor points. These lifeline systems allow the worker to move horizontally along the work surface while being connected to the lifeline.
Horizontal lifelines and their anchors may be subject to extreme force in the event of a fall. Therefore, all permanently installed horizontal lifeline systems must be certified by a professional engineer.
Temporary horizontal lifeline systems are acceptable if they are:
- Manufactured for commercial distribution, and installed and used according to the written instructions provided
- Installed and used according to the written instructions of a professional engineer, or
- Installed and used according to each of the following requirements:
- The horizontal lifeline is a minimum 12 mm (1⁄2 in.) diameter wire rope having a breaking strength specified by the manufacturer of at least 89 kN (20,000 lb.)
- The horizontal lifeline is free of splices except at the terminations
- Connecting hardware, such as shackles and turnbuckles, has an ultimate load capacity of at least 71 kN (16,000 lb.)
- The span is at least 6 m (20 ft.) and not more than 18 m (60 ft.)
- End anchors have an ultimate load capacity of at least 71 kN (16,000 lb.)
- The horizontal lifeline has an unloaded sag of approximately the span length divided by 60
- The elevation of the line at any point is at least 1 m (39 in.) above the working surface
- The free fall distance is limited to 1.2 m (4 ft.)
- A minimum of 3.5 m (12 ft.) of unobstructed clearance is available below the working surface
- No more than three (3) workers are secured to the horizontal lifeline
- The horizontal lifeline is positioned so it does not impede the safe movement of workers
After a fall
After a fall, immediately remove from service all equipment used to arrest the fall. You cannot use the equipment again until it’s been inspected and approved by the manufacturer or other approved agent, or by a professional engineer.